This section describes how to configure Microsoft Active Directory Federation Services (AD FS) 3.0 for Single Sign-on (SSO) 2.0 authentication with the PCE.
Overview of AD FS SSO Configuration
To enable AD FS for the PCE, the PCE needs three fields returned as claims from:
- NameID
- Surname
- Given Name
There are two ways for AD FS to produce the NameID claim for an SSO user. The first uses the email field in an Active Directory user account for the NameID.
The second way to return a NameID of an Active Directory user is to use the User Principal Name (UPN). Each user created in Active Directory has an extension to their username that’s ADUserName@yourADDomanName. For example, a user named “test” in an Active Directory domain called “testing.com” would have a UPN of test@testing.com.
Configure AD Users to Use Different UPN Suffixes
To configure different UPN suffix as the source for NameID:
-
Add a UPN suffix. On your system under Server Manager Tools, click Active Directory Domains and Trusts.

-
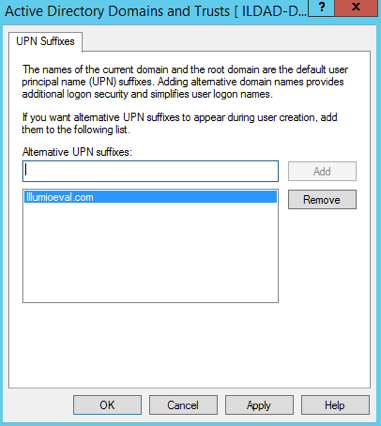
From the left side of the window, right-click Active Directory Domains and Trusts, and select Properties. In this dialog, you can create new suffixes for Active Directory usernames.

-
Create a suffix that matches the external namespace you'll be using and click Add.
You can now assign an Active Directory user your custom UPN for the SAML response.
-
You can add multiple UPNs if needed. As shown below, you can select the UPN created in the previous steps.

Your UPN configuration is set up and you can begin configuring AD FS for SSO with the PCE.
Initial AD FS SSO Configuration
This task explains how to perform the initial configuration of AD FS to be your SSO IdP for Illumio Core.
To configure AD FS:
-
Open Microsoft Server Manager and click the notification icon.

-
Click the “Configure the federation service on this server” link.

-
Select the “Create the first federation server in a federation server farm” option and click Next.

-
Specify a domain admin account for AD FS configuration.

-
Select or import a certificate. This certificate can be a self-signed certificate.

-
Specify your Federated Service Name, enter a display name for this instance of AD FS, and click Next.

-
Specify your service account and click Next.

-
Select “Create a database on this server using Windows Internal Database” or choose the SQL server option, and click Next.

-
Review your selected options and click Next.

-
Click Configure to finish the basic configuration of AD FS.

-
In the results screen, click Close.
AD FS is now installed with the basic configuration on this host.
Create a Relying Party Trust
To start configuring AD FS for SSO with the PCE, you need to create a Relying Party Trust for your Illumio PCE.
- From Server Manager/Tools, open the AD FS Manager.
-
From the left panel, choose Relying Party Trusts > Add Relying Party Trust.

The Add Relying Party Trust Wizard appears.

- Click Start.
-
Select the “Enter data about the relying party manually” option and click Next.

-
Name your Relying Party Trust and click Next.

-
Select “ADFS profile” and click Next.

-
When you have a separate certificate for token encryption, browse to, select it, and click Next.
NOTE:To use the standard AD FS certificate (created during AD FS installation) for token signing, don’t select anything in this step and click Next.

-
Select “Enable support for the SAML 2.0 WebSSO protocol.” In the Relying party SAML 2.0 SSO service URL field, add your “Assertion Consumer URL” (obtained from the PCE web console).

To locate the “Assertion Consumer URL,” go to Settings > Authentication > Information for Identity Provider in the PCE web console:

-
On the Configure Identifiers page, use the same URL for the Relying party trust identifier, without the
/acs/<randomNumbers>. For example:https://pce-mnc.illumioeval.com:8443/login. Click Next.
-
Select the “I do not want to configure multi-factor authentication...” and click Next.

-
Select “Permit all users to access this relying party” and click Next.

-
On the Ready to Add Trust page, click Next.

-
Leave the Open the Edit Claim Rules checkbox selected and click Close.

Create Claim Rules
You need to create claim rules to enable proper communication between AD FS and the PCE.
-
In the Edit Claim Rules dialog, click Add Rule.

-
Under Select Rule Template, select “Send LDAP Attributes as Claims” and click Next.

-
Name the Claim rule “Illumio Attributes” and select Active Directory as the Attribute store. Under the first attribute, select “User-Principal-Name” and “E-Mail Address” as the outgoing. Select “Surname” and type the custom field name of “User.LastName” in the outgoing field. Repeat the values for “Given-Name” and “User.FirstName” and click Finish.

-
In the Edit Claim Rules dialog with your new rule added, click Add Rule to add the final rule.

-
Under the Claim Rule Template, select “Transform and Incoming Claim” and click Next.

-
Name the rule “Email to NameID Transform” and change the incoming claim type to “E-Mail Address.” Set the Outgoing claim type to “Name ID” and the Outgoing name ID format to “Email” and click Finish.

The Edit Claim Rules window opens.

- Select the Issuance Authorization Rules tab.
-
To allow all your Active Directory Users to access the PCE, leave the “Permit Access to All Users” as is. Otherwise, you should restrict access to a single group or groups of users.

-
Select “Permit or Deny Users Based on an Incoming Claim” and click Next.

-
Name the rule “AD FS Users” and change the Incoming claim type to “Group SID” (you might have to scroll to find it). In Incoming claim value, browse to the group of users you want to give access. Make sure “Permit access” is selected and click Finish.

-
If you are using RBAC with groups, you need to create a Goup Claim Rule.
To add groups to AD FS claim rule configuration, click Edit Rule. Add the requirement for “LDAP Attribute: memberOf” by selecting the Outgoing Claim Type as “User.MemberOf.” Click OK.

Obtain ADFS SSO Information for the PCE
Before you can configure the PCE to use AD FS for SSO, obtain the following information from your AD FS configuration:
- x.509 certificate supplied by ADFS
- Remote Login URL
- Logout Landing URL
To obtain the AD FS SSO information for the PCE:
- To find the certificate in your AD FS configuration, log into the AD FS server and open the management console.
- Browse to the certificates and export the Token-Signing certificate.
- Right-click the certificate and select View Certificate.
- Select the Details tab.
-
Click Copy to File.

- When the Certificate Export Wizard launches, click Next.
- Verify that the “No - do not export the private key” option is selected and click Next.
- Select Base 64 encoded binary X.509 (.cer) and click Next.
- Select where you want to save the file, name the file, and click Next.
- Click Finish.
- After exporting the certificate to a file, open the file with a text editor. Copy and paste the contents of the exported x.509 certificate, including the
BEGIN CERTIFICATEandEND CERTIFICATEdelimiters in to the SAML Identity Provider Certificate field. -
To find the Remote Login URL (which AD FS calls “Sign-On URL”), download and open the following metadata file from your AD FS server by navigating to
https://server.mydomain/FederationMetadata/2007-06/FederationMetadata.xmland search forSingleSignOnService.
-
To find the Logout Landing URL for the PCE, you can use the login URL of the PCE (preferred):
https://<myPCENameAndPort>/loginOr, a generic logout URL of AD FS:
https://<URLToMyADFSServer>/adfs/ls/?wa=wsignout1.0You are now ready to configure the PCE to use AD FS for SSO.
Configure the PCE for AD FS SSO
Before you configure the PCE to use Microsoft AD FS for SSO, make sure you have the following information provided by your AD FS, which you configure in the PCE web console:
- x.509 certificate supplied by ADFS
- Remote Login URL
- Logout Landing URL
For more information, see Obtain ADFS SSO Information for the PCE.
When SSO is configured in Illumio Core and for the IdP, the preferences in Illumio Core are used. When SSO is not configured in Illumio Core, the default IdP settings are used.
To configure the PCE for AD FS:
- From the PCE web console menu, choose Settings >SSO Config.
- Click Edit.
- Select the Enabled checkbox next to SAML Status.
- In the Information From Identity Provider section, enter the following information:
- SAML Identity Provider Certificate
- Remote Login URL
- Logout Landing URL
- Select the authentication method from the drop-down list:
- Unspecified: Uses the IdP default authentication mechanism.
Password Protected Transport: Requires the user to log in with a password using a protected session; select this option and check the Force Re-authorization checkbox to force user re-authorization.
-
To require users to re-enter their login information to access Illumio (even if the session is still valid), check the Force Re-authentication checkbox. This allows users to log into the PCE using a different login than their default computer login and is disabled by default.
NOTE:You must select "Password Protected Transport" as the authentication method and check the Force Re-authentication checkbox to force users to re-authenticate.
-
Click Save.
Your PCE is now configured to use AD FS for SSO authentication.