Before deploying the C-VEN, ensure that either of the following two requirements has been met:
- Kubelink is deployed on the Kubernetes cluster and is in sync with the PCE, or
- Firewall coexistence is enabled.
Prerequisites
- VEN deployment file provided by Illumio.
- VEN secret file provided by Illumio.
- Illumio's C-VEN docker image uploaded to a private container registry.
-
In OpenShift, create the 'illumio-ven' service account in the 'illumio-system' project and add this account to the privileged Security Context Constraint (SCC):
oc create sa illumio-venoc adm policy add-scc-to-user privileged -z illumio-ven -n illumio-system
Create a Pairing Profile for Your Cluster Nodes
Before deploying the C-VEN in your cluster, you should create a pairing profile to pair the cluster nodes with the PCE. You only need to create one pairing profile for all your nodes.
You only need to create pairing profiles for Kubernetes or OpenShift nodes and not for container workloads.
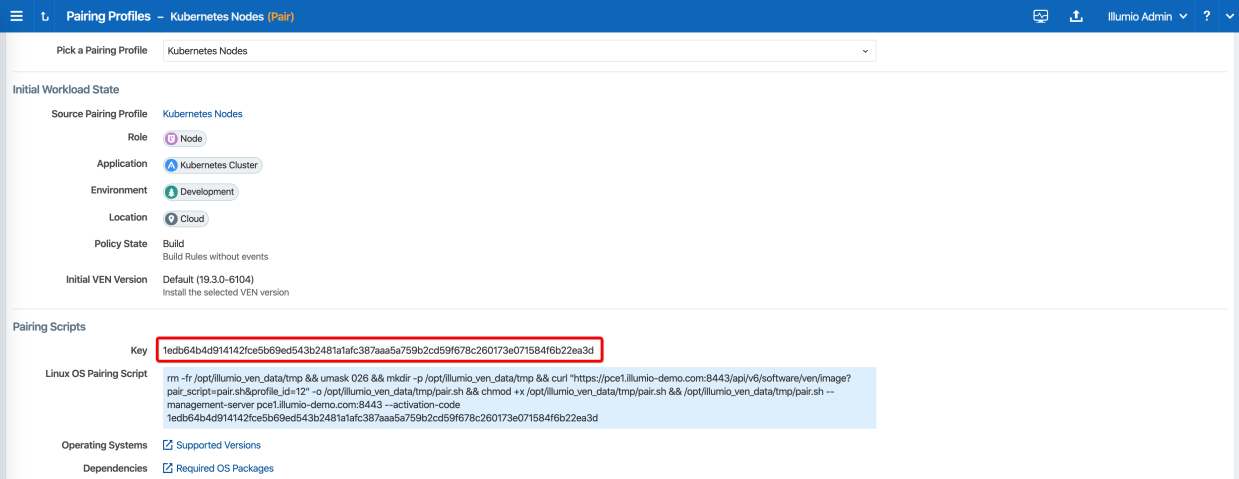
For ease of configuration and management, consider applying the same Application, Environment, and Location labels across all nodes of the same Kubernetes or OpenShift cluster. The screenshot below shows an example of a pairing profile for a Kubernetes cluster.

Illumio recommends all pairing profiles for Kubernetes nodes to not use Enforced policy state. Use Build or Test mode for initial configuration.
You should only move them into enforced state after you have completed all other configuration steps in this guide, such as setup Kubelink, discover services, and write rules.
Configure C-VEN Secret
This section assumes that you have already created a Pairing Profile in the PCE. You will need the activation code for the C-VEN secret.
-
To retrieve the activation code from the pairing profile, go to Policy Objects > Pairing Profiles, open the pairing profile created for your cluster nodes, and click Generate Key.
-
After copying and saving the Key (in a text editor or similar tool), you can exit the page.
-
Open the C-VEN secret YAML file and modify the following keys (under
stringData):ilo_server= PCE URL and port. Example: mypce.example.com:8443ilo_code= Activation code value from Step 1. Example: 1edb64b4d914142fce5b69ed543b2481a1afc387aaa5a759b2cd59f678c260173e071584f6b22ea3d
Contents of a modified
illumio-ven-secret.ymlfile are shown below.# # Copyright 2013-2021 Illumio, Inc. All Rights Reserved. # # VEN 21.5.x-xxxx apiVersion: v1 kind: Secret metadata: name: illumio-ven-config namespace: illumio-system type: Opaque stringData: ilo_server: mypce.example.com:8443 # Example: mypce.example.com:8443 ilo_code: 1edb64b4d914142fce5b69ed543b2481a1afc387aaa5a759b2cd59f678c260173e071584f6b22ea3d # activation-codeCAUTION:Do not use 'https://' for the value associated with the
ilo_server:key. This is a known issue and will be fixed in a future release. -
Save the changes.
-
Create the C-VEN secret using the file.
- To create the secret for Kubernetes:
kubectl apply -f illumio-ven-secret.yml- To create the secret for OpenShift:
oc apply -f illumio-ven-secret.yml - Verify the C-VEN secret creation in your cluster.
- To verify the creation of the secret for Kubernetes:
- To verify the creation of the secret for OpenShift:
kubectl get secret -n illumio-systemoc get secret -n illumio-systemDeploy C-VENs
Modify the C-VEN configuration file to point to the correct Docker image. The example in this document has illumio-ven:21.5.x-xxxx uploaded to registry.example.com:443, so the image link in this example is: registry.example.com:443/illumio-ven:21.5.x-xxxx
- Edit the C-VEN configuration YAML file. The file name is
illumio-ven-kubernetes.ymlfor a Kubernetes cluster andillumio-ven-openshift.ymlfor an OpenShift cluster.- Locate the
spec: > template: > spec: > containers:section inside the YAML file. Modify the image link in theimage:attribute.
- Locate the
-
Save the changes.
Below is a snippet from an example of the C-VEN configuration for Kubernetes or OpenShift to illustrate the image location.
# # Copyright 2013-2021 Illumio, Inc. All Rights Reserved. # # VEN 21.5.x-xxxx --- apiVersion: v1 kind: ServiceAccount metadata: name: illumio-ven namespace: illumio-system --- apiVersion: apps/v1 kind: DaemonSet metadata: name: illumio-ven namespace: illumio-system labels: k8s-app: illumio-ven spec: selector: matchLabels: name: illumio-ven template: metadata: labels: name: illumio-ven spec: priorityClassName: system-node-critical serviceAccountName: illumio-ven hostNetwork: true hostPID: true tolerations: - key: node-role.kubernetes.io/master effect: NoSchedule containers: - name: illumio-ven env: - name: ILO_SERVER valueFrom: secretKeyRef: name: illumio-ven-config key: ilo_server - name: ILO_CODE valueFrom: secretKeyRef: name: illumio-ven-config key: ilo_code command: [ "/ven-init", "activate" ] image: registry.example.com/illumio-ven:21.5.x-xxxx imagePullPolicy: IfNotPresent <...> -
(Optional) Reference your root CA certificate.
If you are using a private PKI to sign your PCE certificate, make sure you add the references to the root CA certificate that signed the PCE certificate. If Kubelink is already deployed in the cluster, the ConfigMap used to store the root CA certificate should already be created in the cluster.Add the following sections to the C-VEN manifest file to reference the ConfigMap containing the root CA certificate:
volumeMounts(underspec.template.spec.containers)volumes(underspec.template.spec)
root-cais the name used to designate the new volume mounted in the container. You can modify it according to your naming convention.volumeMounts: - name: root-ca mountPath: /etc/pki/tls/ilo_certs/ readOnly: false volumes: - name: root-ca configMap: name: root-ca-config -
(Optional) Reference your container registry secret. See the Authenticate Kubernetes Cluster with Container Registry section.
In case you need to authenticate against your container registry when you pull an image from your cluster, you must make reference to the secret previously created for the container registry. Locate the
spec: > template: > spec:section inside the YAML file and add the following lines:imagePullSecrets: - name: <container-registry-secret-name>IMPORTANT:Indentation matters in a YAML file. Make sure there are 6 spaces to the left before inserting the 'imagePullSecrets' keyword and align the '-' character below it with the 'i' of the 'imagePullSecrets' keyword.
-
NOTE:
From the 20.2.0 and later releases, the container runtime detection is done automatically. You do not need to manually modify the container runtime socket path. You should do this 'Modify the container runtime socket path' step only if you are using a customized configuration for your container runtime.
(Optional) Modify the container runtime socket path.In some cases, you have to modify the default socket path the C-VEN relies on to get information about the containers due to the following reasons:
- A non-conventional or customized container runtime socket path
- Two concurrent container runtimes
In this case, you may have to modify the default mount path for the
unixsocksvolume in the C-VEN configuration file.For example, you want to listen on the 'containerd' container runtime, however, docker is also used on the nodes. You should modify the file as shown below, so that the C-VEN listens to events on 'containerd':
volumeMounts: - name: unixsocks mountPath: /var/run/containerd/ <...> volumes: - name: unixsocks hostPath: path: /var/run/containerd/ type: Directory <...> - Save the changes.
- Deploy C-VEN.
- For Kubernetes:
kubectl apply -f illumio-ven-kubernetes.yml- For OpenShift:
oc apply -f illumio-ven-openshift.yml - Verify the deployment.
- For Kubernetes:
- For Kubernetes:
- For OpenShift:
kubectl get pods -n illumio-systemoc get pods -n illumio-system
The illumio-ven-xxxxxxxxxx-xxxxx Pods should be in the "Running" state.
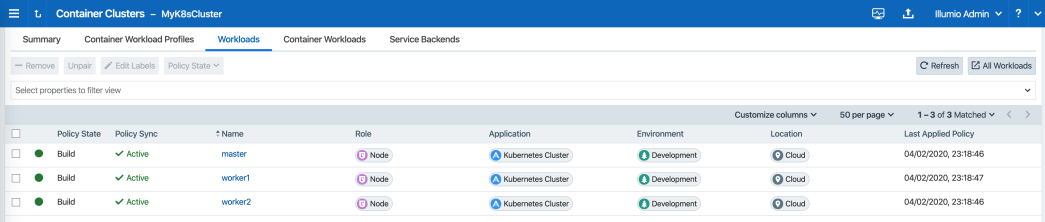
After C-VENs are successfully deployed, you can check the cluster information in the Illumio PCE UI. From the main menu, navigate to Infrastructure > Container Clusters.
You can also verify in the PCE UI that the C-VENs were successfully deployed by checking the following:
- Under the Workload tab, nodes that are part of your Kubernetes or OpenShift cluster should be listed. An example is shown below.
-
Under the Container Workloads tab, Pods deployed in your Kubernetes or OpenShift cluster should be listed. An example is shown below.

- Illumination Map now displays system and application Pods running in your cluster.