Download the required resources such as, Kubelink docker image, secret, and deployment files from the Illumio Support portal (login required).
Prerequisites
- Kubelink deployment file provided by Illumio.
- Kubelink secret file provided by Illumio.
- Illumio's Kubelink docker image uploaded to your private docker registry.
Configure Kubelink Secret
This section assumes that you have created a Container Cluster object in the PCE. You will need the Cluster ID and Cluster Token values for the Kubelink secret.
-
Open the Kubelink secret YAML file and modify the following keys that are listed under
stringData:ilo_server= the PCE URL and port. Example:https://mypce.example.com:8443ilo_cluster_uuid= Cluster ID value from previous step. Example:15643adc-ac09-40f2-be63-fd9a261f41ccilo_cluster_token= Cluster Token from previous step. Example:1_e94c116a4485ab1bb8560728afd6a332182b849c841297f63e73a87bf255cc96ignore_cert= SSL verification. The value is boolean and is recommended to be set to false so that Kubelink requires PCE certificate verification. Example: 'false'log_level= Log level where '0' for debug, '1' for info, '2' for warn, or '3' for error. Example: '1'
IMPORTANT:Illumio does not recommend turning off SSL verification (
ignore_cert: 'true'). However, this is an option for deployments in which the PCE uses a self-signed certificate. For PCE deployments using a certificate signed with a private PKI, there is no need to set theignore_cert keyto 'false'. For more details, see Create a ConfigMap to Store Your Root CA Certificate.The contents of a modified
illumio-kubelink-secret.ymlfile are shown below.# # Copyright 2013-2021 Illumio, Inc. All Rights Reserved. # apiVersion: v1 kind: Secret metadata: name: illumio-config namespace: illumio-system type: Opaque stringData: ilo_server: https://mypce.example.com:8443 # Example: https://mypce.example.com:8443 ilo_cluster_uuid: 42083a4d-dd92-49e6-b495-6f84a940073c # Example: cc4997c1-408b-4f1d-a72b-91495c24c6a0 ilo_cluster_token: 10_d1ea040af1fb0ef60d2660fa093cfb9fad46462a33b887c9ba8a3e3bac1a95d # Example: 170b8aa3dd6d8aa3c284e9ea016e8653f7b51cb4b0431d8cbdba11508763f3a3 ignore_cert: 'false' # Set to 'true' to ignore the PCE certificate log_level: '1' # Default log level is infoNOTE:If you are going to use a private PKI to sign the PCE certificate, see Create a ConfigMap to Store Your Root CA Certificate before deploying Kubelink.
- Save the changes.
-
Create the Kubelink secret in your Kubernetes or OpenShift cluster.
- Deploy Kubelink secret in Kubernetes:
kubectl apply -f illumio-kubelink-secret.yml- Deploy Kubelink secret in OpenShift:
oc apply -f illumio-kubelink-secret.yml -
Verify the Kubelink secret creation in your Kubernetes cluster.
- Verify Kubelink secret in Kubernetes:
kubectl get secret -n illumio-system - Verify Kubelink secret in OpenShift:
oc get secret -n illumio-systemDeploy Kubelink
Modify the Kubelink configuration file to point to the correct Docker image. The example in this document has illumio-kubelink:2.0.x.xxxxxx uploaded to registry.example.com, so the image link in this example is: registry.example.com/illumio-kubelink:2.0.x.xxxxxx
- Edit the Kubelink configuration YAML file. The file name is
illumio-kubelink-kubernetes.ymlfor a Kubernetes cluster orillumio-kubelink-openshift.ymlfor an OpenShift cluster.- Locate the
spec: > template: > spec: > containers:section inside the YAML file. Modify the image link in theimage:attribute.
- Locate the
-
Save the changes.
Below is a snippet from an example of the Kubelink configuration for Kubernetes to illustrate the image location.
apiVersion: apps/v1beta1 kind: Deployment metadata: name: illumio-kubelink namespace: illumio-system spec: replicas: 1 selector: matchLabels: app: illumio-kubelink template: metadata: labels: app: illumio-kubelink spec: # nodeSelector: # node-role.kubernetes.io/master: "" serviceAccountName: illumio-kubelink tolerations: - key: node-role.kubernetes.io/master effect: NoSchedule containers: - name: illumio-kubelink image: registry.example.com/illumio-kubelink:2.0.x.xxxxxx imagePullPolicy: Always env: - name: ILO_SERVER valueFrom: secretKeyRef: name: illumio-kubelink-config key: ilo_server - (Optional) Reference your root CA certificate.
If you are using a private PKI to sign the PCE certificate, make sure you add the references to the root CA certificate that signed the PCE certificate. By default, the current manifest file provided by Illumio does not include this modification. Open the .yml file and add the following code blocks:volumeMounts(underspec.template.spec.containers)volumes(underspec.template.spec)
root-cais the name used to designate the new volume mounted in the container. You can modify it according to your naming convention.volumeMounts: - name: root-ca mountPath: /etc/pki/tls/ilo_certs/ readOnly: false volumes: - name: root-ca configMap: name: root-ca-config - (Optional) Reference your container registry secret. See the Authenticate Kubernetes Cluster with Container Registry section.
In case you need to authenticate against your container registry when you pull an image from your cluster, you must make reference to the secret previously created for the container registry. Locate thespec: > template: > spec:section inside the YAML file and add the following lines:imagePullSecrets: - name: <container-registry-secret-name>IMPORTANT:Indentation matters in a YAML file. Make sure there are 6 spaces to the left before inserting the 'imagePullSecrets' keyword and align the '-' character below it with the 'i' of the 'imagePullSecrets' keyword.
- Deploy Kubelink.
- To deploy Kubelink for Kubernetes:
kubectl apply -f illumio-kubelink-kubernetes.yml - To deploy Kubelink for Kubernetes:
- To deploy Kubelink for OpenShift:
- Verify your deployment.
- To check the Kubelink Pod status for Kubernetes:
kubectl get pods -n illumio-system - To check the Kubelink Pod status for Kubernetes:
- To check the Kubelink Pod status for OpenShift:
oc apply -f illumio-kubelink-openshift.ymloc get pods -n illumio-systemThe illumio-kubelink-xxxxxxxxxx-xxxxx Pod should be in the "Running" state.
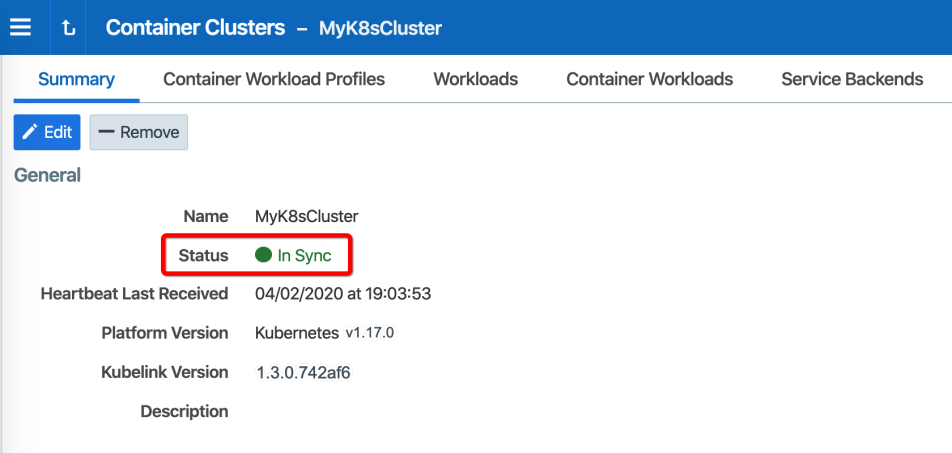
After Kubelink is successfully deployed, you can check the cluster information in the Illumio PCE UI. From the main menu, navigate to Infrastructure > Container Clusters.
Below is an example of a healthy container cluster state reported by Kubelink, where Status is "In Sync".
You can also verify in the PCE UI that Kubelink was successfully deployed by checking the following:
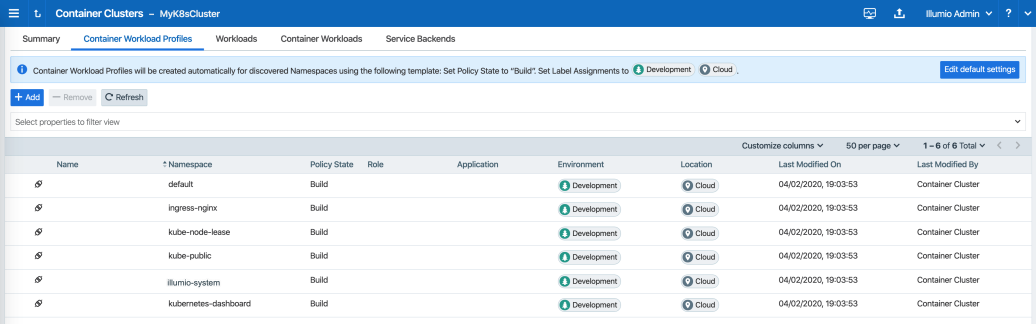
- Under the Container Workload Profiles tab, namespaces created in your Kubernetes or OpenShift cluster should be listed. An example is shown below.
-
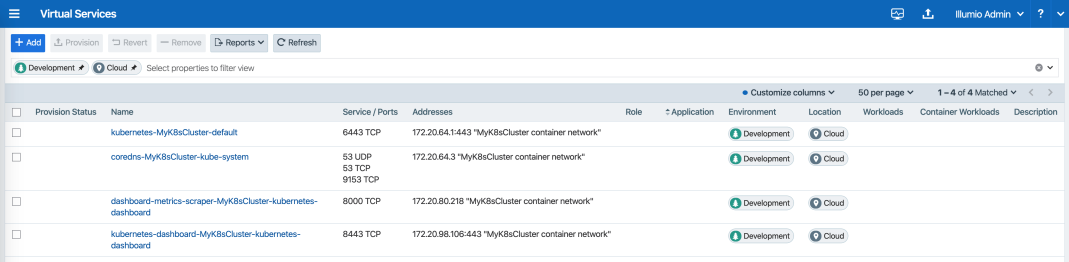
Under Policy Objects > Virtual Services, services created in your Kubernetes or OpenShift cluster should be listed. An example is shown below.