This topic explains how to create the different types of rules in the Illumio Core. For descriptions of the types of rules, see Rules.
You can also use the Illumination map to write rules. For information, Write a Group Level Rule In Illumination in the Visualization Guide.
In previous releases, this feature was referred to as “Segmentation Rulesets.” In Illumio Core 21.5.0 and later releases, this feature is now referred to as “Rulesets.” Some images might still display the previous feature name.
Create an Intra-Scope Rule
Intra-scope rules allow communication within a group. The ruleset scope applies to both providers and consumers. For more information about intra-scope rules, see Intra-scope Rules.
- If necessary, create a Ruleset or open an existing one. See Rulesets for information.
- In the Intra-Scope Rules section, click the Add icon (+).
-
From the Consumers drop-down list, select or type the name of the consumer of the service.
NOTE:The consumer must match the Ruleset scope.
- In the Providers drop-down list, select or type the name of the provider of the service (for example, Database) . You can select from a range of entity types that match the scope, such as an individual workload, a virtual service, or an unmanaged workload.
-
From the Providing Service drop-down list, select a service (for example, PostgreSQL).
NOTE:Only one service or all services can be selected.
- (Optional) To enable SecureConnect, select SecureConnect from the Providing Service drop-down list. For more information, see SecureConnect.
-
After completing your selections, click the Save icon (
 ) at the end of the row for that rule. NOTE:
To edit this rule, click the Edit icon at the end of the row.
After adding a rule, the Status column displays a green Addition Pending icon. To enforce this rule, you must provision the change. For more information about provisioning, see Provisioning.
Create an Extra-Scope Rule
Intra-scope rules allow communication within a group. The ruleset scope applies to both providers and consumers. For more information, see Extra-scope Rules.
- If necessary, create a Ruleset or open an existing one. See Rulesets for information.
- In the Extra-Scope Rules section, click the Add icon (+).
-
From the Consumers drop-down list, select the consumer of the service.
NOTE:The consumer does not need to match the Ruleset scope.
- In the Providers drop-down list, select or type the name of the provider of the service (for example, Database). You can select from a range of entity types that match the scope, such as an individual workload, a virtual service, or an unmanaged workload. For a full list of permitted provider and consumer combinations in a rule, see Permitted Rule Writing Combinations.
-
From the Providing Service drop-down list, select a service (for example, PostgreSQL).
NOTE:Only one service or all services can be selected.
- (Optional) To enable SecureConnect, select SecureConnect from the Providing Service drop-down list. For more information, see SecureConnect.
-
After completing your selections, click the Save icon (
) at the end of the row for that rule. NOTE:To edit this rule, click the Edit icon at the end of the row.
After adding a rule, the Status column displays a green Addition Pending icon. To enforce this rule, you must provision the change. For more information about provisioning, see Provisioning.
Create a Custom iptables Rule
Custom iptables rules allow you to integrate existing iptables into a ruleset. For more information about custom iptables rules, see Custom iptables Rules.
Creating custom chains is not supported.
About Custom iptables Rules
- Receivers column: Shows the labels representing the resource that receives the custom iptables rule.
- IP Version column: Specifies the IP version used for this traffic.
- iptables Rules applied to Scope column: Contains the entire iptables.
To add a custom iptables rule:
- If necessary, create a Ruleset or open an existing one. See Rulesets for information.
-
From the Rules drop-down menu, select the Custom iptables Rule.

-
In the Type or select a label by name drop-down list, select the entity or entities that will receive the iptables rules by selecting or typing a label name.
NOTE:More than one label can be selected. When you select labels as receivers, the custom iptables rules are sent only to workloads matching those labels and not virtual services or virtual servers.
- From the drop-down IP Version drop-down list, select the IP version (IPv4 or IPv6).
-
Type or paste the iptables commands into the Type or paste a custom iptables rule field. Supported iptables display in green. Unsupported iptables or iptables with errors display in red.
NOTE:The iptables commands must begin with
-t. To delete a row, use Shift+Delete. -
After completing your selections, click the Save icon (
) at the end of the row for that rule.NOTE:To edit this rule, click the Edit icon at the end of the row.
After adding a rule, the Status column displays a green Addition Pending icon. To enforce this rule, you must provision the change. For more information about provisioning, see Provisioning.
When you provision a new custom iptables rule, the VEN performs basic validation before applying on the Linux workload host firewall. If this validation test fails, the VEN will log an event and switch to an Error State. If the validation is successful, the VEN installs the custom iptables rules before the last default rule.
Ordering is not guaranteed across custom iptables rules. Any iptables rule that is closely tied to or depends on other iptables rules must to be written as part of the same rule. For example, when you have three iptables rules to allow ICMP Types 3, 8, 13 and another rule to drop other types of ICMP traffic, all four of these iptables rules must be a part of the same ruleset.
Write Multicast Rules
You can write rules to allow multicast traffic between workloads by writing two rules that follow a very specific workflow.
Multicast Use Case 1
For example, you want some database workloads labeled DB to have multicast for data replication and you want to allow the multicast traffic.
To do this:
- Create an unmanaged workload or an IP list to represent the multicast group IP address (for example, mDNS Group: 239.0.0.251).
- Create a service with port (for example, mDNS: UDP 5353).
-
In the ruleset, create these two rules:
Rule Provider Service Consumer 1 mDNS Group mDNS Group DB 2 DB mDNS Group DB In Rule 1, the consuming entity DB allows outbound packets from DB to 239.0.0.251.
In Rule 2, the mDNS group allows inbound packets from DB.
Multicast Use Case 2
For example, you want to ensure that the DB workloads receive a multicast feed on 224.5.5.5:5800 (multicast source).
To do this:
-
Create an unmanaged workload or an IP list to represent the multicast source (for example, Stock-Feed-Group: 224.5.5.5).
-
Create a service with the correct port (for example, Stock-Feed-Service: UDP 5800).
-
In the ruleset, you create these two rules:
Rule Provider Service Consumer 1 Stock-Feed-Group Stock-Feed-Service Multicast-Source 2 DB Stock-Feed-Service Multicast-Source In Rule 1, the Stock-Feed-Service allows outbound packets from Multicast-Source to 224.5.5.5.
In Rule 2, the provider DB allows inbound packets from Multicast-Source.
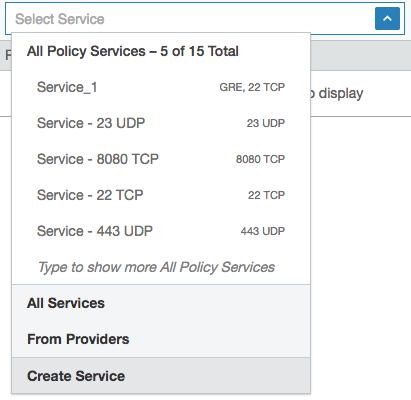
Create Service While Creating Rule
To make rule writing easier, you can create a new service in a ruleset as you are writing rules.
- Create an Extra-Scope or an Intra-Scope Rule.
-
In the Providing Service drop-down list, select Create Service at the end of the list.
- In the Create Service pop-up that appears, enter a name for the service in the Name field and optionally a description in the Description field.
- In the Attributes section, choose whether you want to create a Port-Based or Windows Service-Based service.
- In the Ports section, enter the ports (including any UDP ports) used by the service. To enter a range, separate the port numbers by a hyphen (-). You can also copy and paste lists of services. To delete a row, use Shift+Delete.
- Click OK.
Tips for Managing Rules
- To modify an existing rule, click the edit icon (
 ) at the end of the rule row.
 -
To modify or remove an existing rule, open the Edit menu for that rule at the end of the row.

- To remove multiple rules, select their checkboxes and click the remove (–) icon () in the Rules header row at the top of the page.
- To enable or disable multiple rules, select their checkboxes and click the edit icon in the Rules header row at the top of the page.
- To filter your existing rules, click the Filter icon (
 ) in the Rules header row at the top of the page. The filter drop-down menu appears. Click the drop-down list and select an option to filter rules by label, IP lists, label groups, virtual services, virtual servers, workloads, user groups, services, All workloads, or Any (0.0.0.0/0 and ::/0). If there are no rules that match the selected criteria, a message appears indicating that no rules match your filter criteria.
 - After creating or modifying a rule, an icon appears in the Provision Status column indicating the current provisioning status of the rule (for example, Addition Pending or Removal Pending).
Add a Note to a Rule
You can add a note to a rule to document more information about that rule for context. The note is visible to all users in the organization, but can only by edited by users with Ruleset Manager privileges for the ruleset.
You must provision the changes after adding a note to a rule.
- Select a rule on the Rulesets page.
- Click the Edit button and select Add Note.
- Enter the note in the drop-down entry field that appears. You can enter up to 255 characters.
-
Click Save. You must provision the changes to confirm the note.
Details:
- To indicate the rule contains a note, the following icon is displayed in the Note column:

- To edit an existing note, select the note icon. The entry field displays the existing text. Make any needed changes, then click the Save icon in the lower-right to save the changes to the note.
Duplicate a Rule
- Select the ruleset on the Rulesets page.
- Select the drop-down list next to the Edit button of the rule to be duplicated.
- Select Duplicate. The rule is duplicated in Edit mode, allowing you to make any needed changes.
- Click Save.
After saving the duplicate rule, you must provision the ruleset changes to apply them.
Reverse a Rule
To expedite the rule writing process, you can duplicate and reverse existing rules. The entity selected as the provider in the original rule will be the consumer in the reversed rule and the entity selected as the consumer in the original rule will be the provider.
Caveats:
- Only intra-scope rules are supported. Extra-scope and custom iptables rules cannot be reversed.
- Only rules that use the following resources are supported: Labels, label groups, workloads, IP lists, All workloads, and Any.
- When you do not have sufficient privileges due to RBAC, an error message displays.
- Only one rule can be reversed at a time.
- When the original rule is disabled, the reversed rule is disabled as well.
To reverse (swap Providers and Consumers) in a rule:
- Select the ruleset on the Rulesets page.
- Select the drop-down list next to the Edit button of the rule to be reversed.
- Select Reverse. The rule is reversed in Edit mode allowing you to make any needed changes.
- Click Save.
After saving the reversed rule, you must provision the ruleset changes to apply them.
Reorder Rules
Ruleset owners have the ability to rearrange rules in a specific order to improve readability on the Rulesets details page. Different rule types can be reordered independently.
After reordering the rules, you must provision the changes for them to take effect. Rearranging rules does not affect the order in which they are enforced in the policy.
You can only reorder rules in rulesets that you own. For more information, see Role-Based Access Control in the PCE Administration Guide
To customize the arrangement of the rules, click Reorder Rules on the Scopes and Rules tab of the Ruleset details page.
When you hover over a rule, it is highlighted in the list. To move it, drag and drop the rule to its new location in the list. The other rules are rearranged to accommodate the move. When you place the rule in its new location, the numbers of the rules are reassigned to reflect the new order. If you delete a rule, it remains in place but is appended with “Deletion Pending.” When you have finished rearranging the rules, click Save Order to confirm the new order for the rules.
If more than one user is reordering the rules at the same time, the most recent changes are saved.