This section describes how you create outbound policy for your endpoints by configuring the global Organization Policy in Illumio Edge.
About Organization Policy
In Illumio Edge, you set up outbound policy at the organization level so that the same outbound policies are applied to all endpoints on which you have installed the Illumio Edge agent (known as the VEN). This way, you do not need to replicate outbound rules to all Edge groups. Managing outbound policy is efficient because you do it at the organizational level.
When you view outbound policy for a specific group, the tab displays the rules as read-only. When you update your Organization Policy, you only need to provision the changes once because the changes are provisioned to the PCE as one set of rules.
Elements of Outbound Policy Rules
In outbound policy, each rule includes the following elements:
-
Source Groups
- Illumio Edge groups (which are groups of endpoints)
- User groups (Active Directory groups)
You can specify a single group, multiple groups, or all groups.
- Destination IP Ranges
- IP addresses, CIDR blocks, IP ranges
- Exclude IP addresses, CIDR blocks, IP ranges
- FQDNs, including with wildcard characters
-
Destination Services
- Port and protocol
You can specify multiple services per rule.
NOTE:Illumio Edge includes a list of 100+ service definitions and you can use in policy or you can define your own services.
- Network Profile
- Corporate
- External
You can use the destination services to create very granular outbound security policy. For example, you could have services on a server that you want to control access to. You specify the ports and protocols or Windows processes/services in your Organization policy that only specific endpoint groups can access.
Rule Evaluation for Outbound Policy
Organization policy for outbound control consists of three parts:
- Allow rules
- Deny rules
- A default rule
Illumio Edge evaluates and applies policy in the following order:
- If you haven’t defined a global Organization Policy, a default rule allowing all outbound policy.
-
When you have defined Organization Policy, rules in the following order:
- All allow rules
- Deny rules
-
The default rule that all outbound traffic is allowed
You cannot edit or delete the default rule.
As soon as Illumio Edge finds a match with an outbound rule, that rule controls the outbound traffic and the evaluation process stops.
For endpoints, this is usually how you start creating global outbound policy for the Corporate network profile. Namely, this profile has a default allow for all traffic; then, you can start to define policies based on corporate security, compliance, or audit requirements. Lastly, you define different policies for what users can or cannot connect to outbound from their endpoints.
Policies Using Domain Names
In Illumio Edge, you can use domain names to control allowed traffic for your endpoints. Domain names can be fully-qualified domain names (FQDNs) or domain name patterns using wildcards (for example, *.google.com).
Specifically, you can specify FQDNs in the destination IP ranges for outbound policy.
You can add FQDNs only to IP ranges for allow rules. They are not supported in outbound deny rules.
Adding FQDNs in policy is especially useful for allowing traffic to your corporate applications. For example, you could create an outbound policy by adding an allow rule for your Engineering team to connect to jira.samplecompany.io so they can access your Jira application running in your corporate data center or in your colo hosted in a public cloud.
Illumio Edge provides the same support for FQDNs in policy that Illumio provides for Illumio Core. See FQDN-Based Rules in the Illumio Core Security Policy Guide for more information.
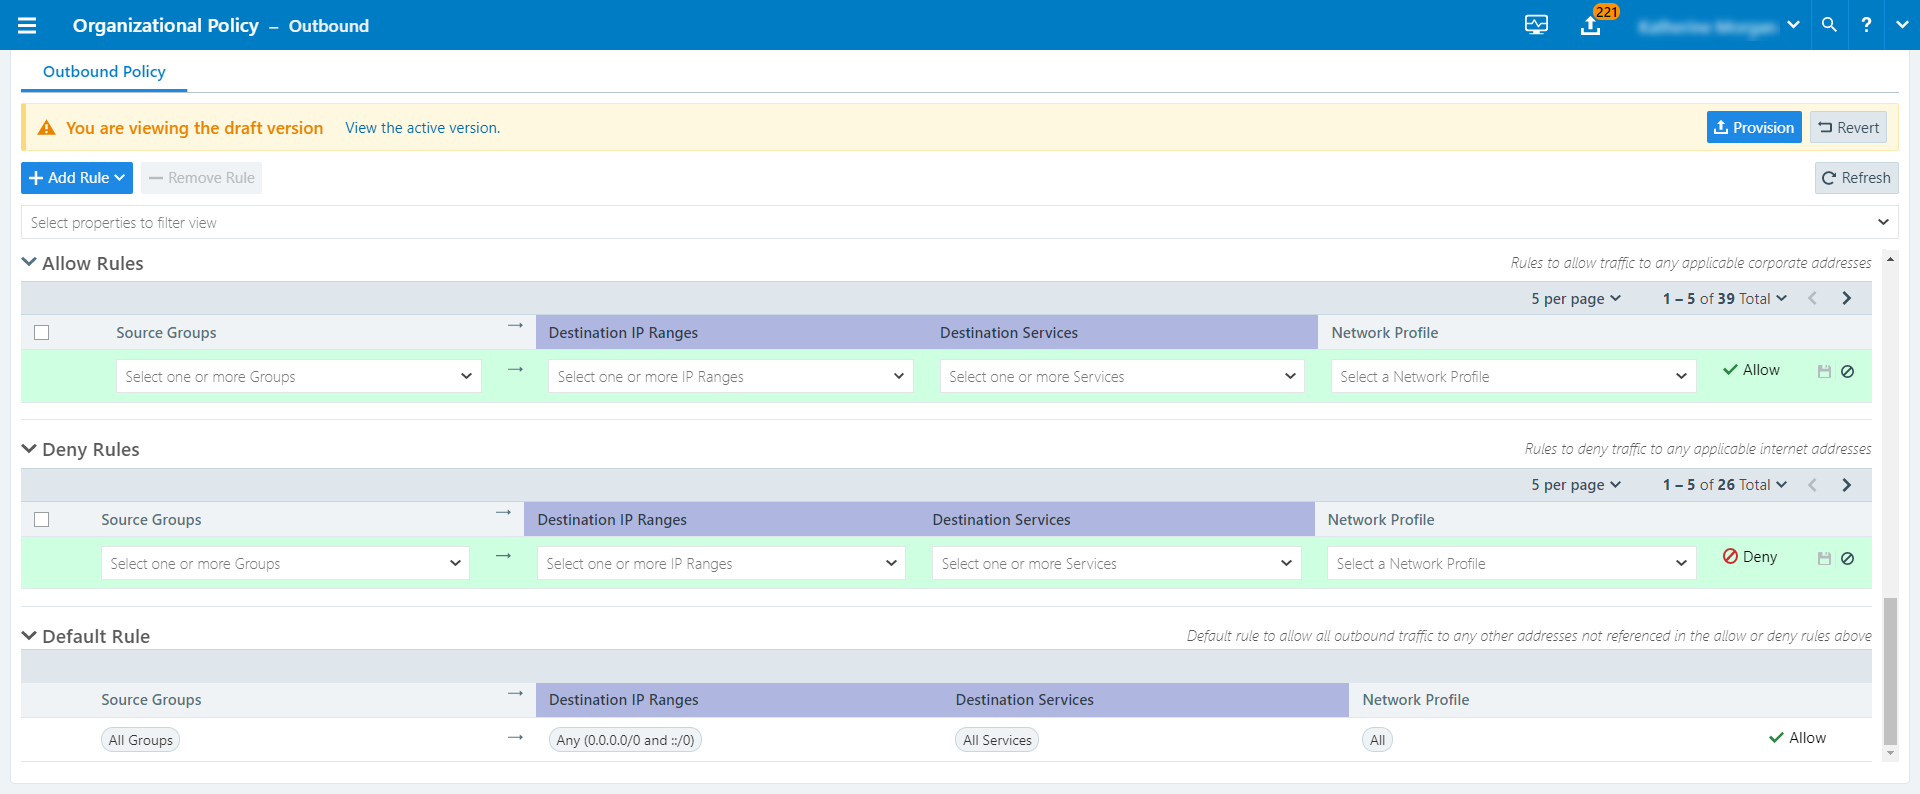
Configure Organization Policy
- From the main menu, choose Organization Policy. The Organization Policy – Outbound page appears.
-
Click Add Rule and choose either allow rule or deny rule.

A new row appears in the table in either the Allow Rules or Deny Rules section depending on the type of rule you are adding.
The structure of each type of rule is the same – source groups, destination IP ranges, destination services, and network profile.
- Complete the settings for the allow or deny rule that you are adding. See About Organization Policy for more information.
-
Click the Save icon (
 ) for the new rule at the end of the row.
 The new outbound policy is saved as a draft. To provision the policy changes, click Provision. See Provision Policy for information.