The Illumio Xpress policy model is a label-based system, which means that the rules you write don't require the use of an IP address or subnet, like traditional firewall solutions. You control the range of your policy by using labels. This helps you categorize your workloads more quickly and makes it easier to set up your policy.
Label Types
| Label | Description |
|---|---|
|
Role 
|
This label type allows you to describe the “role” (or function) of a workload. In a simple two-tier application consisting of a web server and a database server, there would be two roles: Web and Database. You can use the same role as many times as you want in other rulesets for different applications. |
|
Application 
|
This label type allows you describe the application that a workload supports. When two servers in a two tier application have a relationship with one another because one provides a service (like a database) to another, they likely constitute an application. If an organization has 100 applications, and each application has a separate web role and separate database role, the application role separates each one of the Web and Database role. |
|
Environment 
|
This label type allows you to describe a workload based upon its stage in the product development lifecycle, such as QA, staging and production. |
|
Location 
|
This label type allows you to describe a workload based upon its location. For example, Germany, US, Europe, Asia. Or, Rack #3, Rack #4, Rack #5; or data center AWS-east1, AWS-east2, and so on. |
Additional Dimensions
A given workload cannot have more than one label per type. It’s possible to allow a workload that used a service or services or across boundaries to communicate; for example, if a server is playing multiple roles, such as a database server used by two different applications, Illumio recommends that you create different role labels for that workload.
System Default “All” for Labels
When you log into the PCE for the first time as the organization owner, the following default labels are provided:
| Label | Description |
|---|---|
| Role | Web, Database, Mail, Single Node App |
| Environment | Production, Stage, Dev, Test |
| Applications | None |
| Location | None |
The built-in (default) Environment, Application, and Location labels are defined as “All,” which enables you to create broad policies to cover All Applications, All Environments, and All Locations.
To avoid confusing policy writers, Illumio recommends not creating labels named “All Applications,” “All Environments,” or “All Locations” (exactly as written in quotes).
When you attempt to create labels of these types with the exact name as the system defaults, for example “All Applications,” an “HTTP 406 Not Acceptable” error will be displayed.
You can modify or delete these default labels at any time.
Filtering Labels and Label Groups
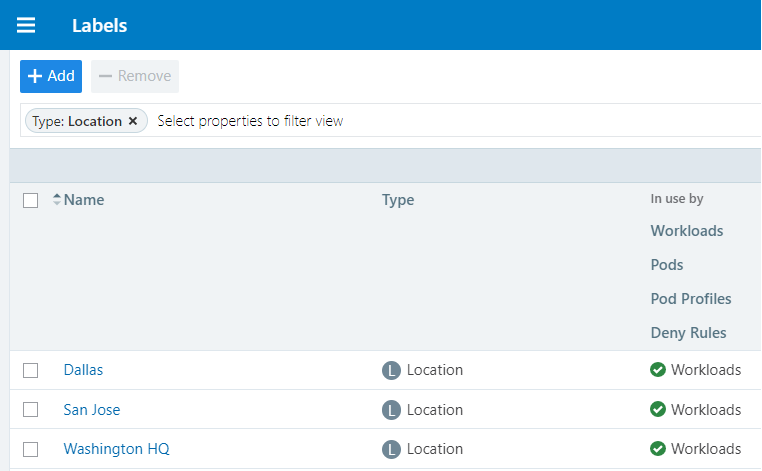
To find the label or labels groups you are looking for, you can use the property filter at the top of the Policy Objects > Labels or Label Groups pages.
On the Labels page, you can filter by label type and exact label name. Similarly, you can filter by label name, description, and provision status on the Label Groups page. For example, if you want to only see Location labels, you can select Type: Location in the Label property filter.
Create a Label
- From the PCE web console main menu, choose Policy Objects > Labels.
- On the Labels page, click Add.
- Enter a label name (such as, Web) and choose a label type (such as, Role).
- Click Save.
Label Workloads
You apply labels to workloads to identify their function or purpose in an application (Role label), the application they belong to (Application label), their network environment (Environment label), and their location (Location label). After a workload is labeled, you can write rules using the labels you have applied to the workload.
After you Create a Label, you can label a workload in two ways:
- Automatically label the workloads when you pair them by adding labels in the pairing profile. (See Pairing Profiles and Scripts in the VEN Installation and Upgrade Guide.)
- Add labels to the workload on the Workload Summary page. In the PCE web console, select Workloads and VENs > Workloads from the left navigation menu. Select a workload, and in the details panel click Edit to select any or all of the four label types to apply to the workload.
Edit Labels for Multiple Workloads
You can add, modify, or remove labels on multiple workloads. This approach saves time when you want to apply or remove the same label or set of labels to more than one workload at a time. Previously, if you wanted to delete a label and it was in use by a virtual server, you would not know if it was in use or not. In the Illumio Xpress, on the Labels page, the "In use by" column includes Virtual Servers. The Labels' summary page also displays the "In Use By Virtual Servers Yes/No" field.
Keep in mind that label changes do not require provisioning, so mass label changes can potentially have a major impact on your rulesets, rules, and overall security policy.
- From the PCE web console main menu, choose Workloads and VENs > Workloads.
- From the left side of the Workloads list, select the workloads you want to change labels for.
-
From the top of the Workloads list, click Edit Labels.
A dialog box appears asking if you are sure you want to edit labels for multiple workloads.
- Click OK.
-
In the Edit Labels dialog box, you can add or remove labels assigned to the selected workloads. The top of the dialog indicates how many workloads will be affected buy the label change. Depending on the assigned labels, you have three general options:
- When the selected workloads share the exact same label of a specific type (for example, Role), you can change the current label by clicking the little X on the label to remove it. Then, you can type or select a new label assignment.
- When the selected workloads have different labels of the same type, faded text in the Label field indicates that the workloads contain multiple labels of that type. You can click in the Label field and add a new label.
- When you remove a label assignment, that label is removed from all selected workloads.
- When you are finished, click OK.
Edit Labels for Multiple Workloads Using a .CSV File
You can use a .csv file to add or change multiple labels on multiple workloads at once.
If you have workloads already paired with VENs, it is best practice to first export and modify a .CSV file.
To Export and Modify a .CSV File:
-
Browse to the Workloads and VENs > Workloads screen and Select Export > Export as .CSV.
-
Save it with a new name and open it.
-
Remove all but the href, hostname (you may need to be renamed from 'name'), loc, env, app, and role columns. (The other columns are unnecessary for editing labels.)
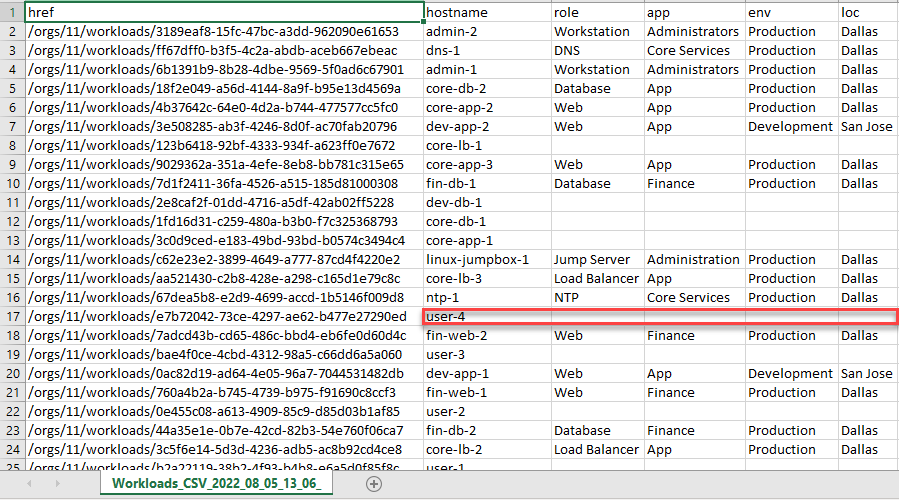
Your exported .CSV file may look something like this:
-
Then remove rows containing workloads with existing labels, unless you wish to change existing labels. In this example, assume we wish to populate the remaining empty cells with appropriate values. This .CSV file becomes the one you import to label your workloads.
Your .CSV file that you wish to import should look something like the following:

For example, in the image of the exported .CSV file seen in step 3, user-4 in row 17 had no labels. Once the modified .CSV is applied, user-4 will be labeled with Washington HQ, Production, Users, and Workstation, as indicated in row 10 in the image immediately above.
You are now ready to label your workloads with your new .CSV file.
To Label Your Workloads with a .CSV File:
- In the main menu, browse to Workloads and VENs > Workloads .
- Select the Import button.
- Browse to your newly modified .CSV file, select it, and click Open. Your workloads that lacked labels or had their former labels updated by the .CSV file will now show their new labels in the Workloads and VENs > Workloads screen.
Label Caveats
Do not delete any of the objects (e.g., labels, rulesets, pairing profiles, or services) associated with an endpoint group. This will break the onboarding, pairing, etc., which may result in unexpected behavior.
Label Groups
Label groups help you write your security policy more efficiently when you use the same labels repeatedly in rulesets. When you add those labels to a label group, the label group can be used in a rule as a shortcut or an alias for multiple labels. The Label Groups list pages can contain up to 10,000 label groups and the individual Label Groups pages can contain up to 10,000 members. You can use filters to find labels or label groups.
For example, you have workloads residing in data centers in Dallas, New York, and Washington and you want to apply a rule to all those workloads. Instead of using the labels for Dallas, New York, and Washington in three separate rules, you can define a Location label group named US, add those three location labels to the label group, and use the US label group.
Label groups are displayed as a list that includes the following details:
- Provision status
- Name of the label group
- Type (Role, Application, Environment, Location)
- When it is currently in use by a ruleset, label group, deny rules, RBAC, and container settings
- Last modified date and time
- User who last modified the label group

Policy Calculation Using Label Groups
Label groups can be nested, so it is important to understand how label groups can affect policy.
You cannot assign a label group to a workload - only individual labels can be applied to workloads. Label groups can only be used in rulesets.
Create a Label Group
Create label groups when you want to combine several labels that share common characteristics into a single label category. After the labels are added to a Label Group, you can use the label group in a rule.
- From the PCE web console main menu, choose Policy Objects > Label Groups.
- On the Label Groups page, click Add.
- In the Add Label Group page, choose the label type and enter a name for the label.
- Click Save.
- In the Members tab, enter a label name to find labels to add to the group, and then click Add. You can add as many labels (or label groups) of the same type to the group.
Use a Label Group in a Rule
When you use a label group in a rule, the label group is expanded into multiple rules. Cross-communication is allowed.
For example, the Non-Prod label group is used here, , which allows cross-communication. The following ruleset:
| App | Env | Loc | |
|---|---|---|---|
| Labels | HRM | All | US |
| Destinations | Services | Sources | |
| Rule | Non-Prod DB | MySQL | Non-Prod DB |
Means “allow MySQL from Non-Prod DB to Non-Prod DB for the HRM application in All environments located in the US" and would allow the following communication:
- HRM | Dev | US | DB ← HRM | Dev | US | DB
- HRM | Dev | US | DB ← HRM | QA | US | DB
- HRM | Dev | US | DB ← HRM | Stage | US | DB
- HRM | QA | US | DB ← HRM | Dev | US | DB
- HRM | QA | US | DB ← HRM | Stage | US | DB