Illumination Classic provides rich visibility into your workloads (traffic flows, running services) without blocking traffic, so you can build and test policies before you enforce them.
Search in Illumination Classic
You have the ability to search for specific locations and groups in the Illumination map at a global level. This feature is especially helpful when managing dozens or even hundreds of locations or groups in the Illumination map.
- Click on the magnifying glass in the upper left corner next to Search Illumination.
- Select the location where you want to perform search.
- Click inside the location to open the command panel.
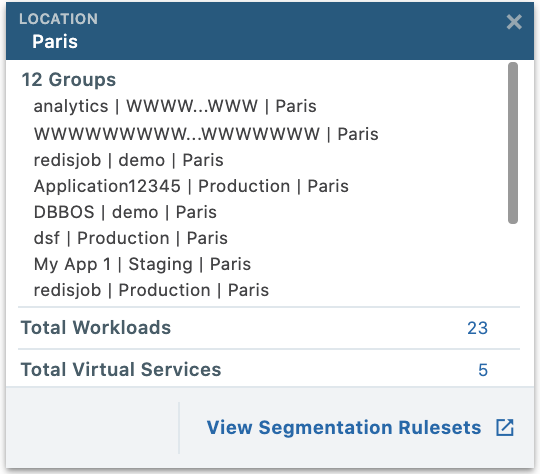
- Click the group for which you want to see the details.
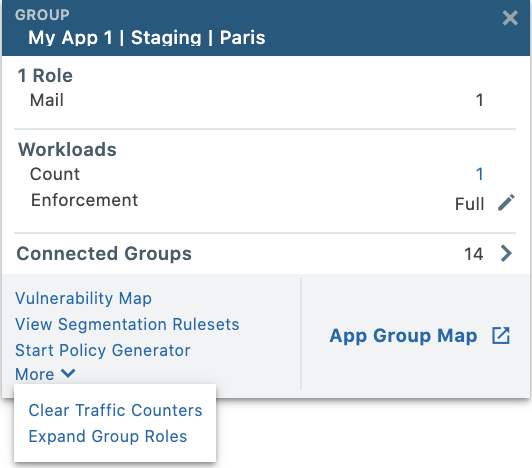
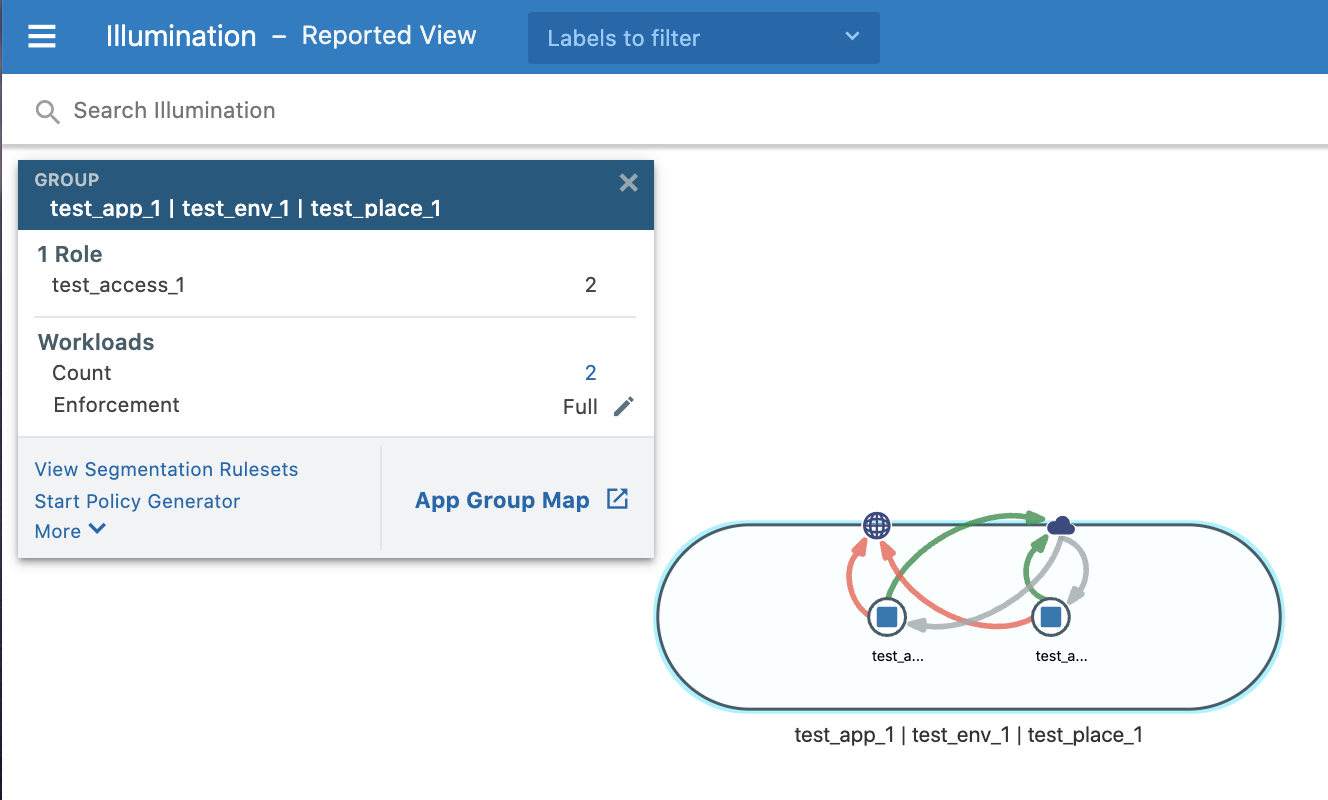
- The group's command panel shows the following:
- Workloads associated with the group
- Workload's enforcement (with an option to edit)
- A link to locate groups connected to the selected group in the Illumination (Connected Groups)
- Links that allow you to view associated rulesets, to start Policy Generator, clear traffic counters or expand group roles
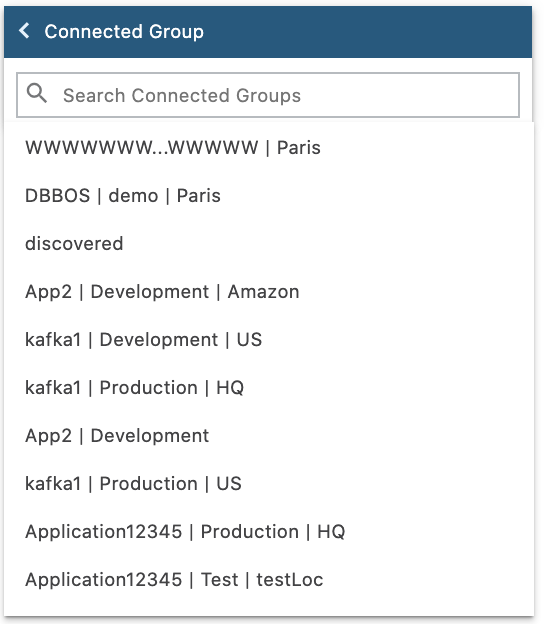
- Click the arrow next to Connected Groups. A list of all groups connected on this location shows.
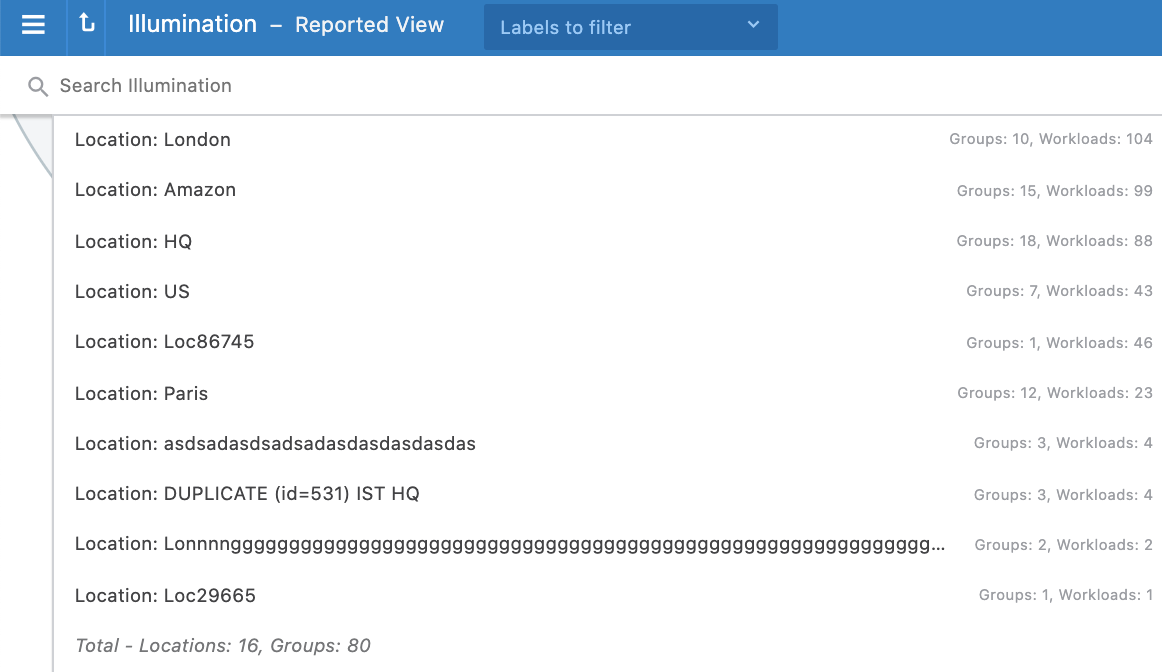
The command panel lists all groups on that location.
The VEN uploads the traffic flow data to the PCE every 10 minutes. The “Increase VEN Update Rate” option increases the rate at which the information is uploaded, which helps you see the flow more frequently. When you click “Increase VEN Update Rate” from the App Group window, the data gets uploaded every 30 seconds for the next 10 minutes. After 10 minutes, it resets to the default value of uploading the data every 10 minutes.
Clear Traffic Counters
To draw the traffic patterns on the Illumination map, the PCE stores all traffic data that flows between workloads.
When you want see only current traffic data and purge traffic connections that might have stopped, you can clear all traffic counters between two workloads, for all the workload communication in the group, or for your entire organization:
- To clear all traffic between two workloads, select a traffic link and click Clear traffic counters in the command panel.
- To clear traffic for an entire group, select the group and click Clear traffic counters in the command panel. In the dialog, select For this Group only and click OK.
- To clear traffic for an entire group, select the group and click Clear traffic counters in the command panel. In the dialog, select For entire Organization and click OK.
Write Rules In Illumination Classic
You can write rules for traffic inside of groups by selecting traffic links and specifying the traffic flows you want to allow in a rule. This means that only the traffic that you permit between workloads is allowed and all other undefined traffic is blocked.
This method is for writing rules on an individual basis. To write larger sets of rules for your workloads, Illumio recommend using rulesets. See Rulesets for more information.
Inter-group traffic links to and from discovered groups from the selected group on the Details view are displayed in gray.
To write rules for workloads:
-
In the Illumination Draft view, select one of the traffic links between the workloads. In the command panel, workloads and enforcement are displayed.

-
To allow this traffic, click Add rule in the command panel.
An Add rule panel appears.
- You can edit the rule and choose to add it to the recommended ruleset.
-
Click Save.
The traffic link turns green to indicate a permitted flow for the workloads.
Write a Group-Level Rule
In the Illumination map, you can write a rule that allows all workloads in the group to communicate with each other. You can write this type of rule from any Illumination Classic view level: Global, Groups, and Detail view levels. This feature is useful if your goal is to ringfence A software-built “fence” that secures and typically isolates high-value assets to mitigate the risk of access from East-West connectivity to other systems. a particular application instance or high value asset, when you want only the group’s members to communicate with each other, but you want to separate it from everything else in your organization.
To write a group-level rule:
-
From the PCE web console main menu, choose Illumination.
The Illumination map appears.
-
Select the group you want to write a group-level rule for.
The command panel appears.
-
In the command panel, click Add Rule.
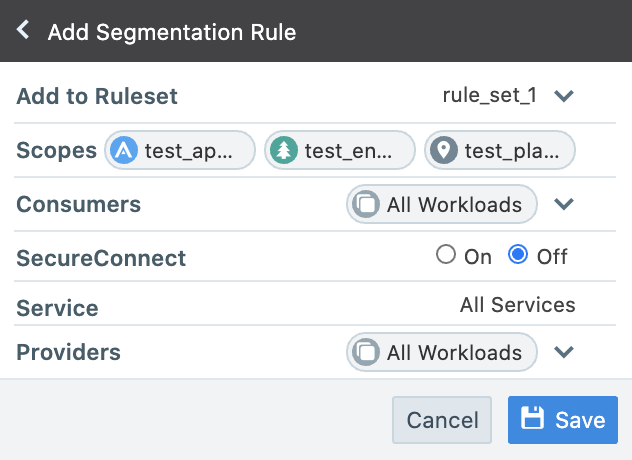
The command panel opens an Add Rule dialog box. In the dialog box, you can write a rule that allows all workloads and other entities to communicate with each other for all services.
- In the Add Rule dialog box, select a ruleset to add the rule to, or leave the default when one is already configured for the group, and complete the rest of the rule fields.
(Optional) Select SecureConnect when you want to encrypt traffic between workloads.
Set Group Enforcement
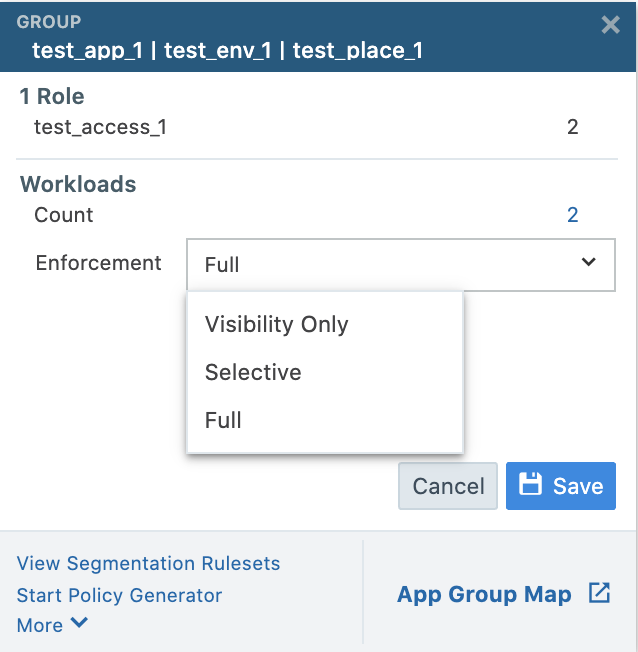
After you have written rules for a group, you can change the group's enforcement, which determines how a group's rules affect the communication among the group's workloads.
You can choose from the following enforcement states for the workloads inside of a group:
- Visibility only. In this state the PCE displays the flow of traffic to and from the workload, providing insight into the data center and the applications running in it. No traffic is blocked in this state.
- Full Enforcement. A state of a workload in which all ruleset rules are enforced and all traffic flows that are not allowed by the rules are blocked.
- Selective Enforcement: Selective enforcement applies only to managed workloads; it does not apply to unmanaged workloads. It controls which ports or services are enforced on workloads.
To set group enforcement:
-
From the PCE web console main menu, choose Illumination.
The Illumination map appears.
-
Find the group for which you want to change enforcement and click inside the group.
The command panel appears.
- Click the edit tool next to Enforcement.
- The pop-up dialog explains that editing affects only the workloads in this group.
Click Continue. - The group's command panel allows you to select the enforcement from the drop-down list.
-
Select the new enforcement type and click Save
Create Unmanaged Workloads from IP Addresses
From the Illumination map, you can quickly create unmanaged workloads from IP addresses. A reverse DNS lookup is done on the IP addresses to obtain and display the server name for the unmanaged workload. The server names are only displayed in the PCE web console. When you export the file, it lists IP addresses.
The DNS names are not displayed in Illumination Classic for Illumio Xpress customers.
When you select an IP address in Illumination Classic that is not currently associated with another policy object, it automatically populates the IP address into an unmanaged workload with the following values:
- A default interface of eth0
- The hostname, which is the IP address by default
IPv4 or IPv6 addresses displayed in Illumination Classic can be selected from the internet, IP lists, or traffic links. The default interface and hostname can be changed if needed and labels can be added to the unmanaged workload.
Until new traffic for the unmanaged workload is observed, the traffic lines are not displayed for the unmanaged workload. The traffic lines in Illumination Classic are updated after new flows are reported by the PCE.
If you try to create an unmanaged workload from an IP address where an unmanaged workload already exists, an error message is displayed.