The Illumio PCE supports the use of either SAML SSO or LDAP as an external authentication method. Both SAML SSO and LDAP cannot be used at the same time. When LDAP is turned on, the use of SAML SSO, if already configured, is disabled. Similarly, enabling SAML SSO after LDAP is enabled will disable LDAP authentication.
SAML SSO Authentication
When you use a third-party SAML-based Identity provider (IdP) to manage user authentication in your organization, you can configure that IdP to work with the PCE. By configuring a single sign-on (SSO) IdP in the PCE, you can validate usernames and passwords against your own user management system, rather than having to create additional user passwords managed by Illumio Core.
Illumio Core currently supports the following SAML-based IdPs:
- Microsoft Active Directory Federation Services (AD FS)
- Okta
- OneLogin
- Ping Identity
You can use other SAML-based IdPs; however, configuring those IdPs is your responsibility as an Illumio customer.
Before you configure SSO in the PCE, you need to configure SSO on your chosen IdP and obtain the required SSO information. After obtaining the IdP SSO information, log into the PCE web console and complete the configuration.
PCE Information Needed to Configure SSO
Before you configure SSO in the PCE, obtain the following information from your IdP:
- x.509 certificate
- Remote Login URL
- Logout Landing URL
The PCE supports the following optional attributes in the SAML response from the IdP:
- User.FirstName - First Name
- User.LastName - Last Name
- User.MemberOf - Member of
Details
User email address is the primary attribute used by the PCE to uniquely identify users.
The client browser must have access to both the PCE and the IdP service. The Illumio PCE uses HTTP-redirect binding to transmit SAML messages.
To obtain the SSO information from the PCE:
- From the PCE web console menu, choose Settings >Authentication.
- Select SAML as the SSO method and click Configure.
-
Use the displayed information (as shown in the example below) while configuring your specific IdP.
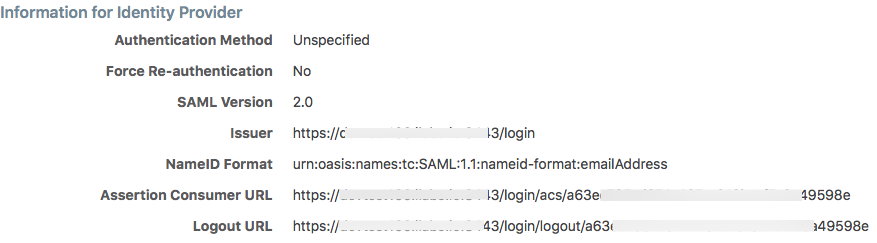
Even though the SAML NameID format specifies an emailAddress, the PCE can support any unique identifier such as, userPrincipalName (UPN), common name (CN), or samAccountName as long as the IdP is configured to map to the corresponding unique user identifier.
LDAP Authentication
The PCE supports LDAP authentication for users with OpenLDAP and Active Directory. The PCE supports user and role configuration for LDAP users and groups. You can configure up to three LDAP servers and map users and user groups from your LDAP servers to PCE roles.
To use LDAP authentication:
- Review the Prerequisites and Limitations.
- Enable the PCE to use LDAP authentication. See Enable LDAP Authentication.
- Set up an LDAP configuration. See Configure LDAP Authentication.
- Map your LDAP groups to one or more PCE roles. See Map LDAP Groups to User Roles.
Prerequisites and Limitations
Before configuring LDAP for authentication with the PCE, complete the following prerequisites, and review the limitations.
Determine Your User Base DN (Distinguished Name)
Before you map your LDAP settings to PCE settings, determine your user base distinguished name ("DN"). The DN is the location in the directory where authentication information is stored.
If you are unable to get this information, contact your LDAP administrator for assistance.
Additional Considerations
When configuring the PCE to work with LDAP, be aware of the following support:
- PCE uses LDAP protocol version 3 ("v3").
- Supported LDAP distributions include OpenLDAP 2.4 and Active Directory.
- Supported LDAP protocols include LDAP, LDAPS, or LDAP with STARTTLS.
Limitations
- Any user that is created locally will have precedence over an LDAP user of the same name. For example, if the LDAP server has a user with a username attribute (such as, cn or uid) of johndoe and the default PCE user of the same name is present, the PCE user takes precedence. Only the local password will be accepted and on login, the roles mapped to the local user will be in effect. To work around this limitation, you must delete the specific local user.
- LDAP and SAML single sign-on cannot be used together. An organization can either use LDAP or SAML single sign-on for authenticating external users.
Enable LDAP Authentication
By default, the LDAP authentication feature is disabled. To enable LDAP authentication:
-
Add the following lines to the PCE
runtime_env.ymlfile and restart the PCE.enabled_preview_features: ldap_authentication_enabled: true -
After the PCE restarts, log in to the PCE web console as a Global Organization Owner. Only a Global Organization Owner is allowed to manage authentication settings to the PCE.
- Choose Settings > Authentication.
- In the Authentication Settings screen, locate the LDAP configuration panel and select Configure.
- In the LDAP Authentication screen, select Turn On.
Configure LDAP Authentication
Follow these steps to configure LDAP authentication on the PCE. Make sure you have first followed the steps in Enable LDAP Authentication.
- Log in to the PCE as a Global Organization Owner.
- Choose Settings > Authentication.
- On the Authentication Settings screen, locate the LDAP configuration panel and click Configure.
- In the LDAP Authentication screen, make sure LDAP is enabled.
- Click + Create Server.
-
In the LDAP Server Create Screen, enter information to configure LDAP as follows:
- Name: Enter a friendly name for the LDAP server.
- IP Address or Hostname: The IP address or hostname of the LDAP server.
- Protocol: Select one from LDAP, LDAPS (Secure LDAP) or LDAP with STARTTLS.
- Port: Enter a port number if you are not using a default port. Default ports are 389 for standard LDAP, 636 for LDAPS, and 389 for LDAP with STARTTLS.
- Anonymous Bind: The configuration of anonymous bind depends on the PCE software version. In versions prior to 19.3.6+H1, the use of anonymous bind is not recommended. Choose Do not Allow. In 19.3.6+H1 or later, when using an Open LDAP server, you can use anonymous bind. Choose Allow if you want to use anonymous bind. When using Active Directory, the use of Anonymous Bind is not recommended. Choose Do not Allow and specify values for Bind DN and Bind Password.
- Bind DN: Distinguished name (DN) used to bind to the LDAP server. The configuration of the bind DN depends on the PCE software version. In versions prior to 19.3.6+H1, the bind DN is required. In 19.3.6+H1 or later, the bind DN is required only when Anonymous Bind is set to Do not Allow.
- Bind Password: Required only when Bind DN is required. When using Anonymous Bind, no bind password is used.
- Request Timeout Period: This is the number of seconds to wait for a response from the LDAP server. The default is 5 seconds. It can be configured to any value from 1-60 seconds.
- Trusted CA Bundle: The bundle of certificates including the chain of trust to use when the LDAP server uses either LDAPS or LDAP with STARTTLS.
- Verify TLS: Enabled by default. This flag specifies whether to verify the server certificate when establishing an SSL connection to the LDAP server. Disabling this is not recommended.
- User Base DN: Base DN of the LDAP directory to search for users.
- User DN Pattern: (Not used in 19.3.6+H1 or later.) Pattern used to create a DN string for a user during login. For example, uid=*,ou=people, where * will be replaced with the username.
- User Search Filter: Search filter used to query the LDAP tree for users.
- User Name Attribute: Attribute on a user object that contains the username. For example, uid, sAMAccountName, userPrincipalName.
- Full Name Attribute: Attribute of a user object that contains the full name. For example, cn, commonName, displayName.
- Group Membership Attribute: Attribute of a user object containing group membership information. For example, memberOf, isMemberOf.
- Click Test Connection to verify that the PCE is able to successfully connect to the LDAP server. If Test Connection fails, check your LDAP configuration and retry.
You can enter up to three LDAP server configurations for a PCE. For more information about using multiple LDAP servers, see How the PCE Works with Multiple LDAP Servers.
Map LDAP Groups to User Roles
After you configure the PCE to use LDAP authentication, map PCE user roles to the LDAP server's groups. When a user attempts to log in, the PCE queries the server(s) to find the user. It grants the user permissions based on any PCE user roles associated with the LDAP groups in which the user is a member.
To change user permissions, use one of the following options:
- To change the permissions for a group of users, you can remap the LDAP group to a different PCE role.
- To change the permissions for an individual user, you can move the user to an LDAP group mapped to a different PCE role. You do this action on the LDAP server.
You can also perform these user management activities:
- Add a user to a PCE role: On the PCE, map the PCE role to an LDAP group. Then, on your LDAP server, add the user to that LDAP group.
- Remove a user from a PCE role: Remove the user from the corresponding LDAP group on your LDAP server.
A user can have membership in several roles. In that case, the user has access to all the capabilities available for any of those roles. For example, if a user is a member of both the docs and eng LDAP server groups, and the docs group is mapped to the PCE user role "Ruleset Manager" and the eng group is mapped to "Ruleset Provisioner," the user obtains all permissions assigned to both the "Ruleset Manager" and "Ruleset Provisioner" roles
The PCE checks LDAP membership information when a user attempts to log in. You do not need to reload the authentication configuration when adding or removing users.
For details about how to map external groups to PCE user roles, see Setup for Role-based Access Control.
Modify LDAP Configuration
Follow these steps to update or delete an LDAP configuration in the PCE. It is assumed you have already followed the steps in Enable LDAP Authentication and Configure LDAP Authentication.
- Log in to the PCE as a Global Organization Owner.
- Choose Settings > Authentication.
- On the Authentication Settings screen, locate the LDAP configuration panel and click Configure.
- In the LDAP Authentication screen, make sure LDAP is enabled.
-
Choose the desired action:
- To delete a configuration, click the Remove icon.
- To modify a configuration, click the Edit icon.
Verify LDAP Connectivity
Follow these steps to test the PCE's connection to the LDAP server(s). It is assumed you have already followed the steps in Enable LDAP Authentication and Configure LDAP Authentication.
- Log in to the PCE as a Global Organization Owner.
- Choose Settings > Authentication.
- On the Authentication Settings screen, locate the LDAP configuration panel and click Configure.
- In the LDAP Authentication screen, make sure LDAP is enabled.
- The LDAP Authentication screen displays a list of configured LDAP server entries. Click Test Connection next to each entry to check whether the configuration is working.
Secure LDAP with SSL/TLS Certificates
The PCE supports LDAPS and LDAP with STARTTLS. To use the PCE with secure LDAP, add the certificate chain to the local certificate store on the PCE. Follow these steps to configure secure LDAP. It is assumed you have already followed the steps in Enable LDAP Authentication and Configure LDAP Authentication.
- Log in to the PCE as a Global Organization Owner.
- Choose Settings > Authentication.
- On the Authentication Settings screen, locate the LDAP configuration panel and click Configure.
- In the LDAP Authentication screen, make sure LDAP is enabled.
- Select your LDAP server from the list of configured server entries and click the Edit icon.
- Make sure Protocol selected is set to either LDAPS or LDAP with StartTLS.
- For the Trusted CA bundle, click Choose File and upload the chain of certificate authority (CA) certificates for the LDAP server.
-
If your LDAP server uses self-signed certificates, uncheck the Verify TLS option.
NOTE:The use of self-signed certificates for an LDAP server is not recommended. Illumio recommends the use of certificates signed by a valid CA.
Authentication Precedence
PCE local authentication takes precedence over any external systems. When the PCE authenticates a user, it follows this order:
- The PCE attempts local authentication first. If the account is expired or otherwise fails, the PCE does not attempt to log in by using LDAP authentication.
- If the local user does not exist, the PCE attempts LDAP login (if enabled).
How the PCE Works with Multiple LDAP Servers
You can configure up to three LDAP servers for each PCE. In a PCE supercluster deployment, the Illumio Core platform can support up to three LDAP servers per region.
When attempting to connect to an LDAP server, the PCE follows the order in which the servers were configured. When the request timeout expires, the PCE attempts to connect to the next server in the configuration. The PCE request timeout is configurable. By default, the timeout is 5 seconds.
For example, assume that you configure three LDAP servers in this order: A, B, C. The PCE attempts to connect to the servers in that order: A, B, C. If the PCE fails to connect to A, it attempts to connect to the remaining servers: first B, then C, after the expiration of the connection timeout.
When the PCE successfully connects to an LDAP server, it searches for the user on that server. If the user is found, the PCE stops looking. If the user is found on server A, even if the user also exists on B and C, the PCE will only use A's credentials for that user.
If the user is not found on the first server, the behavior of the PCE varies depending on the version of PCE software. In version 19.3.6+H1 and later, if the PCE successfully connects to an LDAP server but the user is not found, the PCE attempts to connect to the next server in the configured order, and searches for the user again. In versions earlier than 19.3.6+H1, if the user is not found on the first server, the search stops.
You can not dynamically change the order in which the LDAP servers are contacted. To change this priority order, delete the configured entries and add them back in the desired order.