This section describes how to configure role-based access control (RBAC) for the PCE. Before doing these tasks, be sure to understand the concepts in Role-Based Access Control.
Permission to configure these settings is dependent on your role. See About Roles, Scopes, and Granted Access for information.
Add a Scoped Role
Add a scoped role to create fine-grained access control to manage security policy for your workloads.
You can grant different permissions to different users for different resources by defining scopes. For example, you might allow some users complete access to add rulesets for all workloads in your staging environment. For other users, you might grant access to all workloads in all environments.
- From the PCE web console menu, choose Role-Based Access > Scoped Roles.
- Click Add.
The Access Wizard appears. - Define the scope for the role by selecting labels for Applications, Environment, and Location.
- Add a local user, external user, or user group to the role.
- Select roles. For a description of these role, see About Roles, Scopes, and Granted Access.
-
Click Grant Access > Confirm.
The newly-added role is displayed on the Scoped Roles page and you can select it to edit or remove access.
Manage a Local User
Local users are created in the PCE (they are not managed by an IdP). When they log into the PCE, they must enter their email addresses and passwords. The Illumio PCE encrypts and stores their passwords.
When you install the PCE, the first user account it creates is a local user. You can create additional local users as a backup in case your external IdP goes offline or the SAML server is not accessible.
To add a local user:
- From the PCE web console menu, choose Role-Based Access > Users and Groups > Local Users tab.
- Click Add.
- Enter a name and an email address.
The email address must use the format xxxx@yyyy.zzzz and be 255 characters or less.
In the PCE, you can have duplicate names for local users but you cannot have duplicate email addresses.
The PCE emails the user at the address you specify an invitation with a link to create their Illumio user account. - Select a role for the user:
- None
- Global Organization Owner
- Global Administrator
- Global Read Only
For a description of these roles, see About Roles, Scopes, and Granted Access.
Users without a role (None) have Read Only User access to the PCE when this access is enabled. You can enable and disable Read Only User access in the Global Read Only role.
You can change a user's role membership after adding them by going to the user's details page or from a role details page.
To remove a local user:
- From the PCE web console menu, choose Role-Based Access > Users and Groups.
- Select the user you want to remove.
- Click Remove.
When you remove a local user while the user is online, the PCE logs the user out as soon as the user is removed.
The user is removed from the Local Users tab; however, the user remains in the User Activity page and is designated as offline. The user's actions remain in the Organization Events page.
You can re-add the user to the PCE as a local or external user with the same name and email address or username.
To edit a local user:
- From the PCE web console menu, choose Role-Based Access > Users and Groups.
- Click the name of the user you want to edit.
- Click Edit User.
- Change the user's name and click Save.
You cannot edit a user's email address. You must remove and re-add the user with the new email address.
Changing a local user's name only changes it in the RBAC Roles pages and the Users and Groups page. The name is not changed in the user's personal profile or in the RBAC User Activity pages.
Local and external users can change their name when they create their accounts or from their profiles.
To convert a local user:
- From the PCE web console menu, choose Role-Based Access > Users and Groups.
- Click the name of the user.
- Click Convert User.
You can convert a local user to an external user so that your corporate IdP manages the user authentication credentials. When you convert a user to an external user, the user retains all their role memberships.
To invite a local user:
- From the PCE web console menu, choose Role-Based Access > Users and Groups.
- Click the name of the user.
- Click Re-Invite.
You can send a new email to a user to create their account when they haven't responded to the original email. An invitation remains valid for 7 days.
To lock or unlock a local user:
- From the PCE web console menu, choose Role-Based Access > Users and Groups.
- Click the name of the user.
- Click Lock.
Local users are locked out of their accounts when they fail to log in after 5 consecutive failures.
Locked users retain all their granted access to scopes in the PCE; however, they cannot log into the PCE. When an account is locked, the PCE web console reports that the username or password is invalid even when a user enters valid credentials. The user's account resets after 15 minutes and does not require an Illumio administrator to unlock it.
Add or Remove an External User
Using RBAC, you can control access to Illumio Core for users who are externally authenticated by a corporate IdP. Your corporate IdP manages authentication so that when these users log into the PCE, they are redirected to the IdP to authenticate. The PCE does not validate their usernames or passwords. See Authentication for more information.
Using RBAC, you control the access external users have to Illumio Core features and functionality. When you add an external user to the PCE, you specify that user's access by assigning the user to Illumio roles and scopes.
To add an external user:
- From the PCE web console menu, choose Role-Based Access > Users and Groups > External Users tab.
- Click Add.
- Enter a name and an email address or username.
Whether you enter an email address or username for the user depends on how you have configured your IdP to identify corporate users.
The username can contain up to 225 alphanumeric and special characters (. @ / _ % + -).
In the PCE, you can have duplicate names for external users but you cannot have duplicates email addresses or usernames.
When your IdP is configured to identify users by using email addresses, the PCE emails the user at the address you specify an invitation with a link to create their Illumio user account.
If your IdP is configured to use usernames, you must provide the user your Illumio PCE web console URL. - Select a role for the user:
- None
- Global Organization Owner
- Global Administrator
- Global Read Only
For a description of these roles, see About Roles, Scopes, and Granted Access.
Users without a role (None) can still log into the PCE to view resources when Read Only User access to the PCE is enabled. You can enable and disable Read Only User access in the Global Read Only role.
You can change a user's role membership after adding them by going to the user's details page or from a role details page.
To change an external user's name, click Edit User from the user's details page. You cannot edit the email address or username for an external user. You must remove and re-add the user with the new information.
To remove an external user:
- From the PCE web console menu, choose Role-Based Access > Users and Groups > External Users tab.
- Select the user you want to remove.
- Click Remove.
Removing an external user removes the user from the External Users tab and all the user's RBAC role memberships. The user's authentication is still managed by your corporate IdP.
If Read Only User access to the PCE is enabled for your organization, the user can still log into the PCE and view resources after you remove the user.
When you remove an external user while the user is online, the PCE log the user out the next action they make after being removed.
Add or Remove an External Group
The RBAC feature in Illumio Core integrates with the user groups maintained in your corporate IdP so that you can manage user authentication centrally for Illumio Core. In the PCE, you assign roles and scopes to the groups managed by your IdP to control the access that Illumio users have to their Illumio managed resources.
With user groups, you can authorize your teams to manage the security for the applications they manage without waiting for a centralized security team to delegate authority.
When a user who is a member of an external group logs into the PCE, the corporate IdP authenticates the user and returns the list of groups the user belongs to. For each of those groups, the PCE determines what roles and scopes are assigned to the group. The user is granted access to the resources associated with the roles and scopes.
A user can belong to multiple external groups. When a user belongs to multiple groups, the user is granted access to Illumio resources based on the most permissive role and scopes defined for each group.
To add an external group:
- From the PCE web console menu, choose Role-Based Access > Users and Groups > ExternalGroups tab.
- Click Add.
- In the Name field, give the group a name by which it will be known on the PCE. Enter up to 225 alphanumeric or special characters.
- In the External Group field, enter the group name exactly as it is configured in your IdP, including space characters.
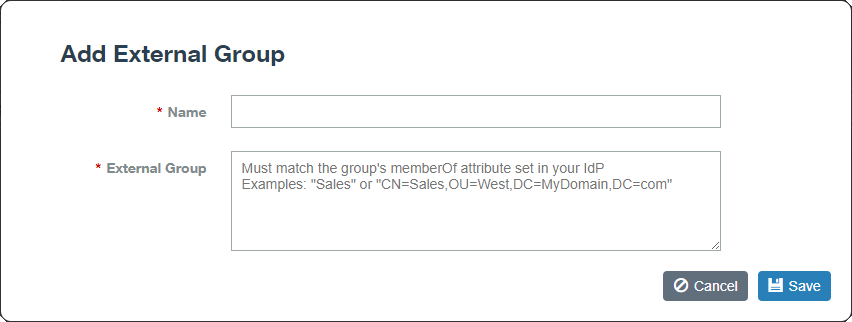
In your IdP, the group is designated by a simple group name (for example “Sales”) or by a group name in distinguished name (DN) format (for example “CN=Sales, OU=West”). To verify the correct format to enter in the PCE, check the memberOf attribute in the SAML assertion from your IdP. The text you enter in the Add External Group dialog must match the IdP's version exactly, including space characters if they are present.
The memberOf attribute is a multiple-value attribute that contains the list of distinguished names for groups that contain the group as a member.
- Click Save.
To change an external group's name, click Edit Group from the group's details page. You cannot edit the External Group field. You must remove and re-add the group with the new information.
To remove an external group:
- From the PCE web console menu, choose Role-Based Access > Users and Groups > ExternalGroups tab.
- Select the external group you want to remove.
- Click Remove.
Removing an external group from the PCE removes all the group's RBAC role memberships and, therefore, removes access for all the group members. User authentication for the group members is still managed by your corporate IdP.
If Read Only User access to the PCE is enabled, the external group members can still log into the PCE and view resources after you remove the group. See About Roles, Scopes, and Granted Access for more information.
Change Users and Groups Added to Roles
When you change the membership for a role, the affected users must log out and log into access the new capabilities.
When you revoke a user's access to scopes or global objects while the user is online, the PCE logs the user out the next action they make after having their access revoked.
- From the PCE web console menu, choose Role-Based Access > Global Roles.
- Click the name of the role you want to assign users or groups to.
- To remove a user or group from the role, select it and click Remove.
- To add a user or group to a role, click Add.
- From the first drop-down list, select what (Any Principal Type, Local Users, External Users, or External Groups) you want to add to the role.
Selecting what you want to add filters the second list to display only those types of users or user groups. - Select the user or group to add to the role.
- Click Grant Access.
Alternatively, you can select users or groups to add to roles from the Role-Based Access > User and Groups details pages, and select Add and follow the steps in the Access Wizard.
View User Activity
You can access a historical audit trail of user activity through the following reports:
-
User Activity: Go to Role-Based Access > User Activity
- Displays session details for each user, including their status, email address, when they were last logged in.
- Click a user, to view all the roles and scopes that are assigned to that user.
The User Activity page also displays users who were removed and are designated as offline.
NOTE:The names that appears in the User Activity pages can be different from the Role-Based Access > Users and Groups pages when users edit their profiles or an Organization Owner changes names in the Role-Based Access > Users and Groups pages.
-
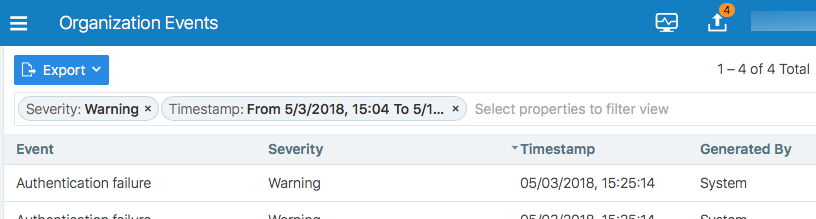
Organization Events: Go to Troubleshooting > Organization Events
The Organization Events page provides an ongoing log of all Organization events that occur in the PCE. For example, it captures actions, such as users logging in and logging out, and failed log in attempts; when a system object is created, modified, deleted, or provisioned; and when a workload is paired or unpaired.
Each of these events have a severity level and they are exportable in JSON format. For a large number of events, you can narrow the search by event type, severity, or time filters.
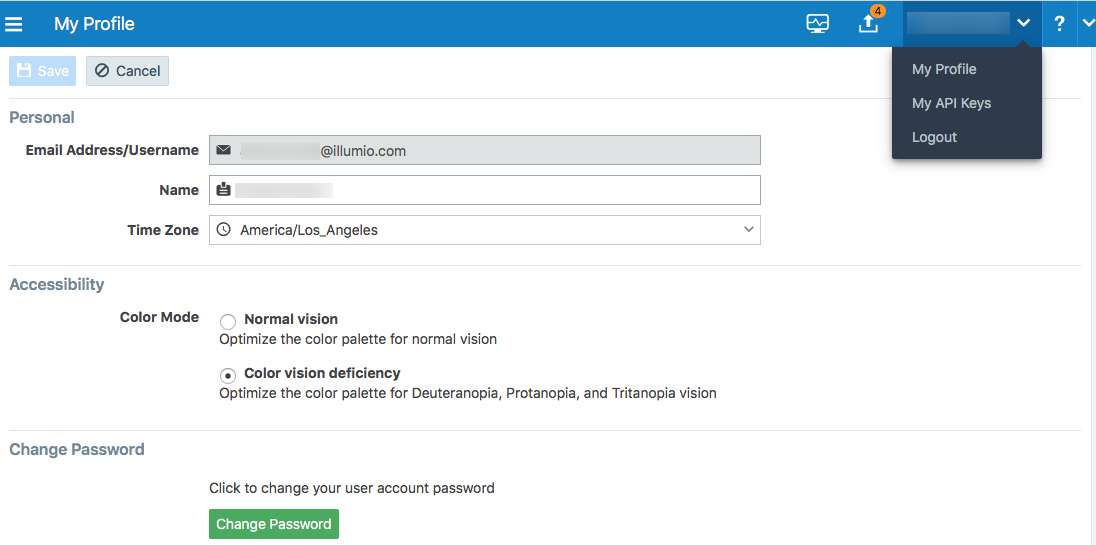
Change Your Profile Settings
If you want to change the password you use to access the PCE web console, you can do so from your User menu located at the top right corner of the PCE web console.
To change your password:
- From the User menu in the PCE web console, select My Profile.
- Click Change Password.
- On the change password screen, enter your current password, and then you new password twice.
- Click Change Password.
Color Vision Deficiency Mode
Users with color vision deficiency (Deuteranopia, Protanopia, or Tritanopia) can select Color Vision Deficiency mode, which makes it easier for color vision deficiency users to distinguish between blocked and allowed traffic lines in the Illumination map. This mode can be enabled on a per-user basis.
The color vision deficiency mode is disabled by default. To enable it:
- From the User menu in the PCE web console, select My Profile.
-
In the Accessibility section, select the Color vision deficiency radio button.
NOTE:To restore the default setting, select the Normal vision radio button.
- Click Save.