Illumio suggests this typical workflow for getting started with your Illumio Managed Services Portal organization:
STEP 1: Accept the Invitation
Accept the invitation to your account and add a new tenant.
You must be a Global Organization Owner to add a customer tenant. For details, see Manage RBAC for Your Illumio Managed Services Portal.
- In your email, find the Your Invitation to Illumio message and click Create Account.
-
In the Welcome to Illumio Multi-tenant Portal screen, click Add New Tenant.
Once you've created a tenant for a customer, you can easily create other tenant types for the same customer by clicking their name in the My Managed Tenants page and then clicking the desired tenant type in the Contract section . A new details page launches, pre-populated with the customer's information. The type of tenant that you selected is indicated in the Contract section.
When you add a tenant for a customer, an audit event is generated automatically. You can view these events from your portal at Troubleshooting > Events. The user ID of the logged-in MSP/MSSP user appears on the Events page in the Generated By field.
-
Choose the type of tenant you want to add:
- Core Tenant
- Xpress Tenant
- Edge Tenant
-
Enter details:
- Name: Enter a descriptive name for the new tenant.
- Customer Domain: Enter a globally unique name in the form of a domain (example.com).
- Company URL: Enter the customer's company website URL.
- Country
- Address lines 1 & 2
- City
- State
- Zip Code
- Click Save.
STEP 2: Configure SAML
Configure SAML single sign-on access for your users (if applicable).
This step applies only if you use a third-party SAML-based identity provider (IdP) to manage user authentication in your organization. If you don't use an IdP to manage identities, skip to STEP 3: Add MSP/MSSP Users.
If you use a third-party SAML-based identity provider (IdP) to manage user authentication in your organization, you can configure that IdP as an external authentication method for your MSP/MSSP users to access your Illumio Managed Services Portal organization. SAML SSO allows login credentials to be validated against your own Identity Management solution instead of requiring your users to create additional user passwords managed by Illumio.
Illumio Managed Services Portal supports any IdP that supports SAML 2.0, including the following:
- Azure AD
- Microsoft Active Directory Federation Services (AD FS)
- Okta
- OneLogin
- Ping Identity
While other SAML-based IdPs may work with Illumio Managed Services Portal, configuring them is the responsibility of Illumio customers.
Before configuring SSO in your Illumio Managed Services Portal organization, configure SSO on your chosen IdP and obtain the required SSO information. Once you've obtained that information, log in to your Illumio Managed Services Portal organization and complete the configuration. For details, see the following documentation:
| Topic |
|---|
| General Information |
| Information Needed to Configure SAML SSO |
| Signing for SAML Requests |
| SSO Instructions |
| Active Directory Single Sign-on |
| Azure Single Sign-on |
| Okta Single Sign-on |
| OneLogin Single Sign-on |
| Ping Identity Single Sign-on |
STEP 3: Add MSP/MSSP Users
Illumio Managed Services Portal organization owners can add other MSP/MSSP users to their organization and grant them roles with specific permissions.
Types of Users
For detailed information about user types, see the topic Setup for Role-Based Access Control in PCE documentation. For information about roles and permissions in the Managed Services Portal, see Manage RBAC for Your Illumio Managed Services Portal
If you consult the topic Setup for Role-Based Access Control, ignore all references to "scopes" and "scoped roles." Illumio Managed Services Portal doesn't support scopes.
Local Users
- Local Users are created and managed by Illumio; they are not managed by an Identity Provider (IdP) solution. Illumio encrypts and stores their password.
- When Illumio creates your Managed Services Portal, the first user account it creates is a Local User. This means that all Illumio Managed Services Portal customers have at least one Local User.
- In organizations that don't use a third-party SAML-based identity provider (IdP) to manage user authentication in their organization, all users in the Managed Services Portal will be Local Users.
- When added as a Local User, MSP/MSSP users are sent an account invite link to the email address specified when they were added. The invite link is valid only for 7 days. If a Local User doesn't receive an email or the link they received expired, you can send them a new link.
External Users (applicable only for customers who implement SAML IdP)
- An External User is externally authenticated by your corporate IdP solution (if you have one). Your IdP solution manages authentication so that when these users attempt to log in to the Illumio Managed Services Portal they're redirected to the IdP to authenticate and then back to Illumio.
- No login or Welcome email is sent to External Users. You must provide MSP/MSSP users a URL to your Illumio Managed Services Portal.
- To allow you to access your Illumio Managed Services Portal in case the external IdP goes offline or the SAML server is not accessible, you may want to consider creating more than one Local User.
External Groups (applicable only for customers who implement SAML IdP)
External Groups are user groups maintained in your corporate IdP solution. Members in an External Group are externally authenticated by your corporate IdP solution (if you have one). Groups allow you to manage user authentication centrally for the Illumio Managed Services Portal. You assign roles to the groups managed by your IdP to control the access that group members have to your Illumio Managed Services Portal organization. When a user who is a member of an external group logs in to the Managed Services Portal, the corporate IdP authenticates the user and returns the list of groups the user belongs to. For each of those groups, the Managed Services Portal determines what roles are assigned to the group. The user is granted access to the resources associated with the roles. A user can belong to multiple external groups. When a user belongs to multiple groups, the user is granted access to Illumio resources based on the most permissive role defined for each group.
Add a Local User
If your organization doesn't use a third-party SAML-based identity provider (IdP) to manage user authentication. In that case, you can only create Local Users. If your organization uses a third-party SAML-based identity provider (IdP) to manage user authentication (see STEP 2: Configure SAML above), you should create at least one Local User as a backup in case the external IdP goes offline or the SAML server is not accessible. Make sure the email address you enter when you add the Local User is not the same address configured for the user in your IdP solution
- Click Access > Local Users in the left pane.
- Click Add.
-
In the Add Local Userdialog box:
-
Enter a name and email address.
NOTE:- If you configured/plan to configure SAML single sign-on access for your MSP/MSSP users and your organization uses a third-party SAML-based identity provider (IdP) to manage user authentication, the email address you enter here must not also be configured in your IdP solution.
- The email address must use the format xxxx@yyyy.zzzz and cannot exceed 255 characters.
- Email addresses with an apostrophe (') are permitted.
- Illumio Managed Services Provider allows duplicate names for local users but not duplicate email addresses.
-
Select a Role. Options include:
- None
- Global Organization Owner
- Global Administrator
- Global Viewer
For details about roles, see About Roles, Scopes, and Granted Access.
IMPORTANT:If you consult the topic Setup for Role-Based Access Control, ignore all references to "scopes" and "scoped roles." The Illumio Managed Services Portal doesn't support scopes.
- Click Add. A success message appears. Illumio sends an email to the specified email address with an account set-up link. The link is valid for 7 days.
-
Add an External User
This procedure is applicable only for customers who implement SAML IdP.
Perform these steps if your organization uses a third-party SAML-based identity provider (IdP) to manage user authentication. Additionally, you can create Local Users as a backup in case the external IdP goes offline or the SAML server is not accessible.
- Click Access > External Users in the left pane.
- Click Add.
-
In the Add External User dialog box:
-
Enter a name and email address.
NOTE:- The email address must use the format xxxx@yyyy.zzzz and cannot exceed 255 characters.
- Email addresses with an apostrophe (') are permitted.
- Illumio Managed Services Provider allows duplicate names for External Users but not duplicate email addresses.
-
Select a Role:
- None
- Global Organization Owner
- Global Administrator
- Global Viewer
For details about roles in the Managed Services Portal, see Manage RBAC for Your Illumio Managed Services Portal.
- Click Add.
-
Add an External Group
This procedure is applicable only for customers who implement SAML IdP.
Perform these steps if your organization uses a third-party SAML-based identity provider (IdP) to manage user authentication and you use groups to manage user authentication centrally.
- Click Access > External Groups in the left pane.
- Click Add.
-
In the Add External Group dialog box:
- Name: Enter a name (max. 225 alphanumeric or special characters).
-
External Group: Enter the group name as it's configured in your IdP solution.
- Click Add.
- Assign a Global Role to the group. You must assign a role for newly-created External Groups because no role is assigned by default.
- In the External Groups page, click the new group that you just added.
- Under Access Roles, click Add Role > Add Global Role.
- Select the role you want to assign to the group.
- Click Grant Access and then Confirm in the confirmation message.
In your IdP, the group is designated by a simple group name (for example “Sales”) or by a group name in distinguished name (DN) format (for example “CN=Sales, OU=West”). To verify the correct format to enter in the PCE, check the
memberOfattribute in the SAML assertion from your IdP. ThememberOfattribute is a multiple-value attribute that contains the list of distinguished names for groups that contain the group as a member.
STEP 4: Create Policy in Managed Tenants
Conceptual information about lllumio products that you'll manage on behalf of your customers, as well as procedures on how to administer them, is beyond the scope of this document. For this type of information, see the relevant information from these sources:
| Illumio Product | Product Documentation |
|---|---|
| Illumio Core | |
| Illumio Xpress | |
| Illumio Edge |
STEP 5: Manage Your Subscription
The Illumio Managed Services Portal integrates with a third-party payment management provider to handle usage-based billing for your Managed Services Portal organization. Illumio has created a subscription to that provider for your organization. You can manage your subscription as described in these steps.
-
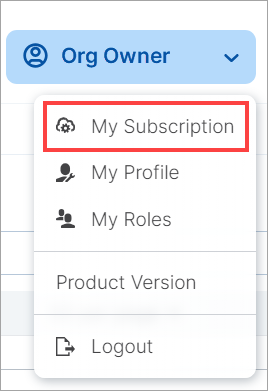
In the upper right-hand corner of the console, click your username, and then select My Subscription from the drop-down menu.
-
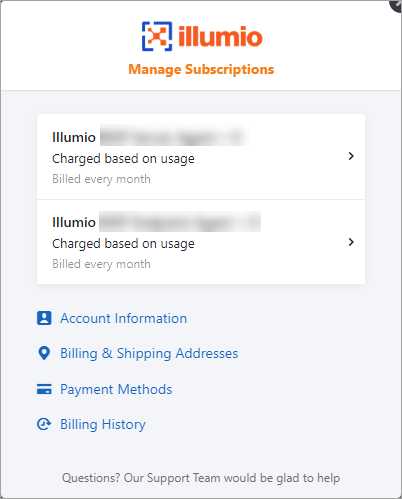
In the Manage Subscriptions dialog box, follow the prompts to enter your credentials and log in.
-
You can view and manage the following areas of your subscription:
- Subscription details. To view, click Charged based on usage for the subscription you want to investigate.
- Account information
- Billing and Shipping addresses
- Payment methods
- Billing history